


Unlike a full-blown desktop computer, laptops aren’t that upgradeable. Some of us may be able to afford a new one every now and then. Still, that’s simply not an option for many budget-conscious buyers. But don’t you worry, with some minimal cost, we can upgrade the performance of old laptops to some degree. So, in this article, I’ll be discussing 4 crucial tips to improve the performance of your old laptop. Here, we’re mainly focusing on the hardware aspect of things, with a few software tweaks on the side as well.
Tips to improve performance of an old laptop
#1. Installing an SSD
The first, and the most obvious and effective way to improve the performance of your old laptop is by installing an SSD (Solid State Drive); provided your device doesn’t already have one. Depending upon the type and quality of SSD, you can notice a significant boost in speed – from boot time to launching heavy apps to shutting down the laptop. Sounds great huh? It’s because they are.
You see, while traditional platter-based hard disk drives use mechanical moving parts to read and write data, SSDs are a flash-based memory; meaning the read/write process happens electronically, based on the charge (or lack thereof) of the transistors. Yep, SSDs have no moving parts whatsoever.
Because of this and a slew of other reasons, these are typically faster, more durable, and significantly energy-efficient compared to HDD. Nevertheless, all this advantage does come at a cost. Literally. SSDs have been around for a while. However, these are much more expensive and their max capacity is quite limited as well. But since we’re dealing with low-investment upgrades, the latter is of no concern for us. So, putting the issue of “expense” into consideration, we suggest a dual-drive configuration for the best bang for your buck. More on that later.
Choosing the right SSD for your laptop
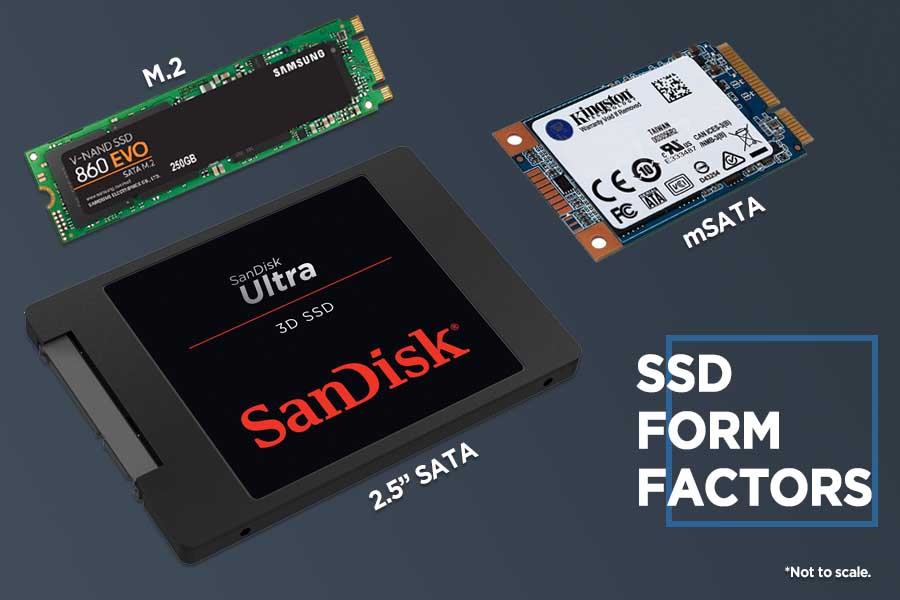
Yet, a piece of solvable bad news remains. The thing is, choosing the right SSD requires a bit of research from your end. For instance, what type of SSD slot does your laptop have, which connector do they use, what’s the compatible size, etc. Don’t worry, we’re here to help. Be sure to check your device’s specifications from the manufacturer’s official or another trustworthy website. If your laptop is quite old, say something from 2015 or earlier, it mostly has a 2.5” Serial ATA (SATA) drive, or an mSATA SSD, and not an M.2 slot.
Unfortunately, if your device uses an even older PATA/IDE connection, we suggest you skip the SSD upgrade altogether since the effort-&-investment to output ratio is pretty unrewarding. Also, some manufacturers solder the HDD or SDD into the motherboard with no additional slot to spare. If that’s the case, your laptop is beyond the reach of an SSD-upgrade.
2.5″ SATA SSD
Anyway, A SATA port on your motherboard looks like a narrow knife with golden stripes and an uneven intersection.
And that’s where the HDD, SSD, or optical drives connect.
SATA is a computer bus interface that connects the aforementioned mass storage devices to the rest of the PC. There are also different standards of speed grades under it: SATA II/3Gbps and SATA III/6Gbps.
This is an important factor to note as well. Because, if your laptop’s motherboard only supports SATA II standard and you try installing a SATA III SSD, the BIOS may fail to recognize it entirely because of the difference in speed standard. So, the key takeaway here is to connect the correct SATA SSD to its compatible SATA port.
Similarly, the 2.5” SSDs have an enclosed design and come with a varying thickness too. Though the most common standard is 7mm, you can also find 9.5mm and 12.7mm SSDs. However, they’re pretty much extinct nowadays as the 7mm has become the standard thickness or “z-height” for 2.5” SSDs. While 7mm variants can be fit into a bay for 9.5mm drive using something called “spacer”, the reverse is physically impossible. As a result, the size of the SATA SSD to buy is also critical.
mSATA SSD
Besides this, there is also the mSATA form factor. Found in very old laptops, mSATA SSD has a bare circuit board and is usually a low-storage SSD. It is mainly meant to function as a boot drive where the system and other programs are installed. Thankfully, laptops with an mSATA drive are rarely seen these days. That’s because almost every manufacturer has moved on to the newer M.2 connectors.
M.2 SSD
Here, M.2 SSDs have a much smaller form factor compared to their SATA and mSATA counterparts. An M.2 slot can interface with SATA III, PCIe 3.0, and even USB 3.0; meaning any disk drive, GPU, network card, or a low-power USB-compatible device can be mounted on a card using an M.2 slot.
Also, an M.2 SSD may use either SATA or PCIe bus.
Without going into any intricate detail, M.2 PCIe SSD uses PCIe lanes for data transfer and is much faster than SATA SSDs; usually by two-folds or more.
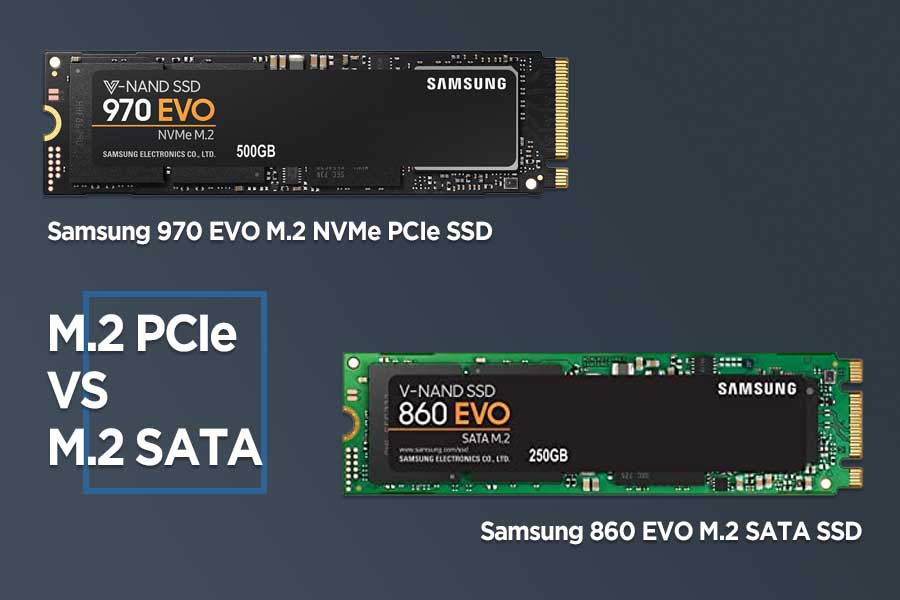
Though M.2 PCIe SSDs may look like the ideal option of the two, you should go for it only if you frequently deal with transferring a large volume of data. Otherwise, a traditional M.2 SATA SSD will do you just fine. Also, they’re more expensive, so there you go.
Additionally, M.2 SSDs also come in different sizes: Type-2242, Type-2260, and Type-2280 (the most common one). Here, “22” refers to 22mm of width, while “42”, “60”, and “80” refer to the length of the wafer. Like with SATA SSDS, you don’t want to buy an M.2 SSD which is physically larger than the length of the M.2 slot on your laptop.
What about the NVMe protocol?
One more thing to keep in mind is if your SSD uses the “NVMe” interface protocol or not. Short for Non-Volatile Memory Express, NVMe works directly with the PCIe bus to deliver read/write speeds at the actual capacity of the flash memory; void of the restriction found in SATA connection.
That translates to insanely fast throughput compared to even the fastest SATA III standard. But to be able to experience the speed of NVMe, the M.2 slot on your laptop’s motherboard must support PCIe SSDs. Once again, check your device’s specification or use software like Speccy or Crucial System Scanner to find out. So, if supported, always go for an M.2 NVMe PCIe SSD to improve the read/write performance of your old laptop.
Buying an SSD for your laptop
Finally, once you’ve confirmed what type of SSD you’re gonna use, it’s time to buy one. Since we’re not actually dealing with a buying guide here, I’m just going to list out some popular SSD manufacturers for reference. Samsung, Seagate, SK Hynix, ADATA, Western Digital (WD), etc. are some of the trusted ones.
> Installing an M.2 SSD
Here, if your laptop has a vacant M.2 slot, then installing an M.2 SSD is easily done and dusted. But there is one thing to make sure of.
That is, if the M.2 SSD and your laptop’s motherboard are compatible.
Since our goal is to set the SSD as a boot device and your existing HDD to be a secondary device, some M.2 SSD may also require UEFI drivers to be preloaded so that the BIOS recognizes it as a boot device.
> Installing a 2.5″ SATA SSD
If your laptop doesn’t have an M.2 slot, your only other option is to install a 2.5″ SATA SSD. You can either replace the existing HDD with an SSD. But you would still want to have both, right? For this to happen, you’ll need an additional accessory known as “caddy”.
Chances are, most old laptops came with an optical drive for CD, DVD, and Blue-ray discs. And if you’re someone who can sacrifice this drive without any significant repercussion to your workflow, then you can install a 2.5” SSD alongside the existing HDD by buying a caddy.
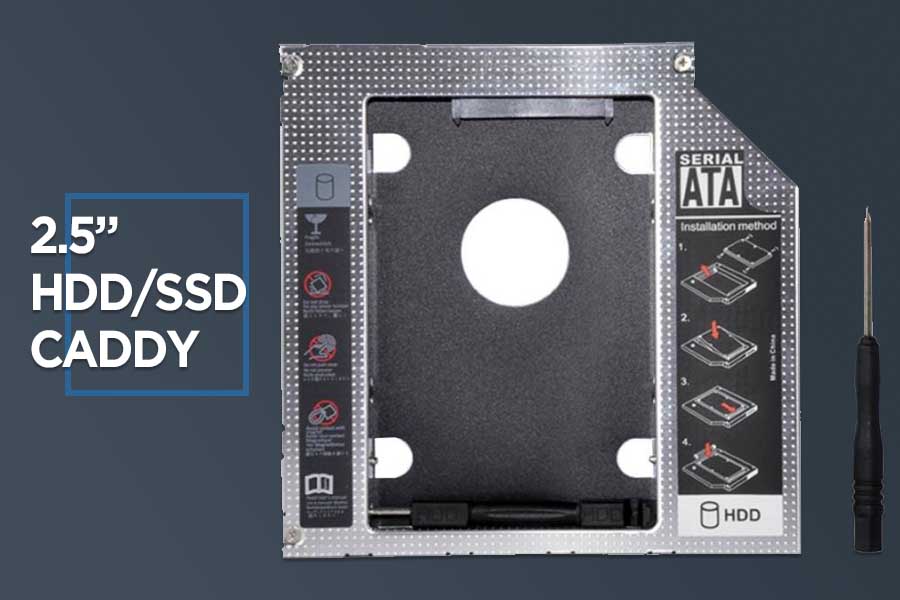
With a form-factor identical to the optical drive, you can install a SATA SSD or an HDD into the caddy, if you will. But (yeah, so many things to consider, I know) there’s not a common standard that OEMs follow towards designing such drives into their laptops. That doesn’t mean every single manufacturer has a different-sized approach. In fact, the opposite. Most of them are similar in size (with a z-height of 7mm), though there are some rare instances of a different thickness too. So, make sure the caddy you’re buying obliges to the size standard of your laptop’s chassis.
Where does the SSD go: 2.5″ bay or caddy?
Now, there’s one more question – where do I install the SSD, into the existing 2.5” bay or the caddy? Usually, both ports have the same SATA standard (II/3Gbps or III/6Gbps). And in such a case, it doesn’t matter where you install the SSD.
Having said that, it’s not unusual for devices to equip different ones. For example: if your laptop’s 2.5” bay has SATA II while the optical drive comes with the faster SATA III connection, installing the SSD into the caddy makes more sense as you’ll be able to able to experience the SSD in its full force.
With this dual-drive configuration, you’ll be able to enjoy faster performance thanks to the SSD, and store your files in the cost-effective HDD. You can also go SSD + SSD but that’ll only ramp up the expenses, which is the exact opposite of our objective.
> Installing OS into the SSD (or cloning it)
Up to this point, I’ve thoroughly discussed how to select the appropriate SSD for your laptop, and how to install them properly to get the performance boost. Admittedly, I’ve skipped steps like unscrewing the base of the laptop, and other physical processes but you get the point.
The next thing we need to do is install the OS into the SSD.
For this, you can either perform a clean installation or clone the existing OS from your HDD into the SSD.
And we highly suggest you go with former since this avoids bringing in all the junk files, viruses, temp files, etc. that may have accumulated in your former disk drive. Also, because we are concentrated on the use of a low-capacity SSD for installing the OS and a couple of other major applications, this is the way to go.
Cloning the Operating System (OS)
Having to install an OS from square one, then its updates and all the other programs and applications you use could be a tedious task. If you don’t want a clean install, there are always options like cloning or migrating the system to the new SSD.
Of course, you can always choose which partitions to clone and which not to. This way, you can copy the boot partitions and not other files like documents, music, etc. You’ll also be needing a software tool like Macrium Reflect Free for cloning Microsoft Windows to an SSD, while manufacturers like Samsung have their own data migration tool called “Samsung Magician”. In our case, we’ll only be cloning the EFI and Windows C: partition (or other partition where you’ve installed Windows OS), while ignoring data and recovery partitions.
This is a pretty sensitive process so make sure you go through a few tutorials on using said software before actually using it. After completing the cloning process:
- Set the SSD to the number one spot in boot priority under the BIOS settings. This means your laptop will now be booting from the newly installed (or cloned) OS from the SSD.
- Then, you can delete the Windows and other partitions from the HDD to save the now unused storage.
By the way, all this process can also be done before installing it into the laptop, by using a USB to SATA adapter that costs around Rs. 1,000. This added cost is also one of the reasons why we recommend a fresh installation instead.
Performing Disk Defragmentation on your HDD
And while we’re dealing with HDD here, you should also go ahead and perform disk defragmentation which can greatly improve the read/write performance on the hard drive of your old laptop. In short, it is the process of physically organizing the file sectors on the HDD so that the physical movement can occur much faster.
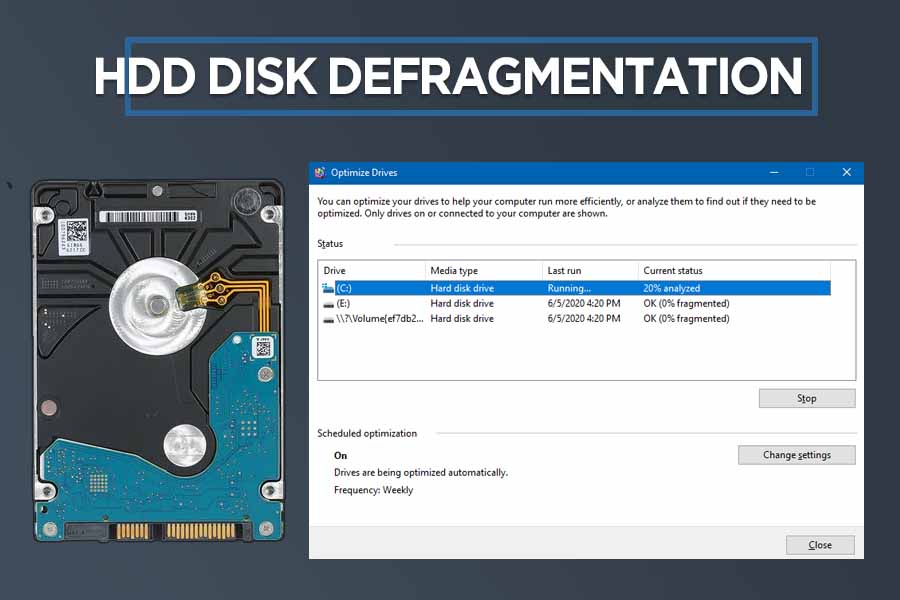
You can use Windows’ built-in disk defragmenter or other third-party software like Defraggler, Smart Defrag.
However, and I cannot stress this enough, do not defrag an SSD!
Due to its radical approach in reading and writing data, SSD defragmentation will only result in unnecessary writes to it, thus shortening the lifespan. On top of it, it’s practically inessential in an SSD as well.
#2. Upgrading the RAM
Another way to improve the performance of your old laptop is by upgrading the RAM. Short for Random Access Memory, RAM is typically a non-volatile memory. It is used to temporarily store information regarding threads and processes that are currently running. In simpler terms, it is where your computer loads up all things. Unlike SSD, just adding RAM sticks into your old laptop won’t necessarily improve the performance.
For instance: if your laptop already has a sufficient amount of RAM, adding to it doesn’t make sense.
The thing is, RAM is like a box of chocolates; larger the box, more chocolates you can store in it.
Is this the most terrible analogy or what? Anyway, what I mean is, more RAM means your computer can handle more processes at a time but if you are someone who usually only runs low-weight applications, even 4GB of RAM may suffice; which is considered simply not enough for 2020. Additionally, should the RAM stick in your device come soldered into the motherboard, say goodbye to the chance of upgrading RAM.
So, let’s lay down the logical and practical conditions necessary for increasing RAM capacity in your laptop:
- Your current setup has a less-than-required RAM capacity.
- You can physically replace the RAM stick. i.e: the only available RAM stick(s) isn’t soldered into the motherboard. And a bonus point if there’s an extra vacant slot.
Number of RAM Slots & Motherboard Support
While a desktop motherboard may have multiple RAM slots depending upon the model, most laptops max out at two. You can check the available memory slots on your laptop by inside the Task Manager. Under the “Memory” option of the “Performance” tab, it shows info like speed, slots used, form factor, etc.
Also, there’s a limit to the capacity of RAM a motherboard can support. For this, check out the product specification sheet from the manufacturer of your device, or visit other trustworthy websites. Here, you may also find out if the memory is soldered in or not. Kingston has this handy website where you can enter your laptop’s make/model, and it shows you all the necessary info about its memory specifications and more.
Types of RAM on Laptops
Okay, with the eligibility out of the way, let us discuss the two main categories of RAM in laptops – SDRAM and DDR SDRAM. In a broader sense, Synchronous Dynamic RAM (SDRAM) indicates how the RAM behaves; an assumption that the data needed by the CPU will be in a sequence. Yet, it also refers to Single Data Rate SDRAM (SDR SDRAM), which can accept one command and transfer one word of data per clock cycle (either on the rise or fall).
On the contrary, Double Data Rate (DDR) SDRAM can fetch data on both the up and down cycles of the clock. Ergo, it has double the data transfer rate without increasing the frequency of the clock.
The first generation of DDR SDRAM was more widely called as DDR1. It was then succeeded by DDR2, DDR3, and the latest standard is DDR4 SDRAM; while DDR5 should be available in either Q3 or Q4 of 2020. DDR3 can be further divided into DDR3, DDR3L, and DDR3U – which have a varying voltage standard. And a motherboard with DDR3 memory slot can take all three standards of its kind.
Without boring you with any details, the thing to understand here is that every new iteration of such RAM standard comes with lesser power consumption, increased transfer rate, and more.
Finding what type of RAM your laptop supports
Now, you might be tempted to install the latest DDR4 RAM stick on your laptop for a performance boost. However, it comes down to the processor-support as well. Even though some modern CPUs can handle both DDR3 & DDR4 memory, older processors typically only favored DDR3 RAM. Furthermore, only some motherboards for Intel Skylake CPU support either DDR3 or DDR4 RAM; that too with a lot of restrictions. In such a case, never mix different types of RAM (e.g. DDR3 and DDR4) in the memory slots. Either use DDR3 sticks only or DDR4 only – but never simultaneously.
Operating System and RAM limitations
That was about the generation of SDRAM. On the other hand, maximum RAM capacity support is also OS-dependent on top of the motherboard support. A 32-bit Windows OS can only support a maximum of 4GB of RAM. Similarly, the 64-bit Windows 7 Home Basic is limited to 8GB. This is not an issue for newer OS releases like Windows 8 or 10. They can boast hundreds of gigabytes and even a couple of terabytes of RAM. You can find out about all the memory limits in different Windows OS on this link.
To know what type of processor architecture your laptop has, just right-click the “My Computer” or “This PC” option and click on “Properties”. Under the system header, you can check out “System Type” which may read as either “64-bit Operating System, x64-based processor” or 32-bit, x86. So, keep in mind what OS you’ll be installing, before upgrading the RAM.
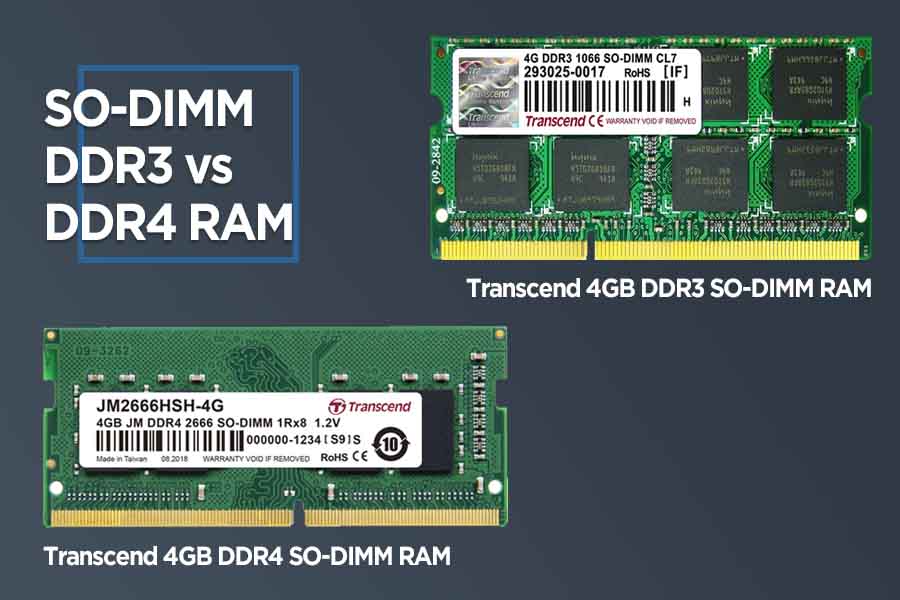
RAM Form Factors (aka, the size)
What’s left? Yeah, the form factor. Like how SSDs come in different shapes and sizes, RAM also comes in varying sizes. However, it’s a lot less complicated here since the differentiation is quite straightforward.
You have the full-size DIMM RAM (Dual In-Line Memory Module) for desktop computers and the SO-DIMM (Small Outline DIMM) RAM for compact devices like laptops. As the name implies, DIMM RAM is larger usually measuring 4.5–5 inches with up to 240 pins, while the latter has a typical length of 2.5–3 inches with up to 200 pins.
Implementing Dual-Channel Memory
There’s also another buzzword associated with upgrading RAM, and that is “dual-channel memory”. To understand this, we first have to know what a single-channel memory is. Under this, a single RAM stick is deployed that uses one 64-bit data channel. In contrast, dual-channel memory uses two 64-bit data channels with two RAM sticks, thus doubling the bandwidth to a 128-bit channel.
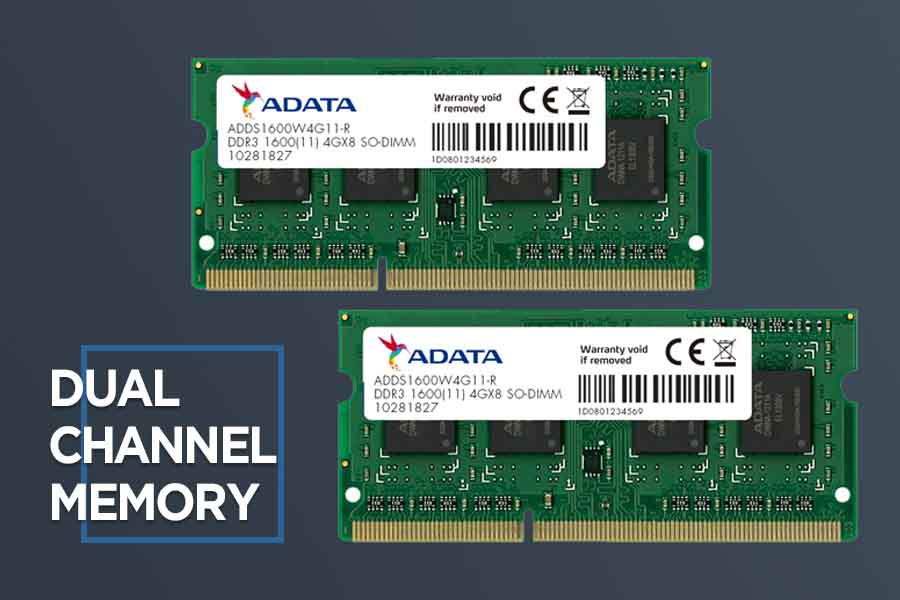
But achieving dual-channel memory isn’t as simple as installing two RAM units into the laptop. Though that can theoretically work, different manufacturers’ RAM sticks vary wildly in terms of memory timings. Using different parameters like CAS latency (CL), tRCD, tRP, and tRAS, it determines the performance level of the RAM. These things are way too technical and mathematical as well, so forgive me for skipping it.
So, dual-channel memory is absolutely guaranteed only when using a combo memory kit (2x 4GB, 2x 8GB, etc.)
Notice how the serial number (ADDS1600W4G11-R) and memory timings (10-28-18-27) are exactly the same in the two RAM kits shown in the image above. What you can infer from this is also the fact that the existing RAM in your laptop will most likely be incompatible with the dual-channel mode. Therefore, always opt for dual-channel memory to improve RAM performance on your old laptop.
Buying RAM stick(s) for your laptop
With all this info taken into consideration, you are finally ready to go buy yourself a RAM kit. Some reputed manufacturers include Corsair, G.Skill, Kingston, ADATA, Transcend, etc. The installation is quite simple.
> Installing the RAM
First, power off the laptop and remove the battery (if possible). Then, press the power button for about 20 seconds to get rid of the residual electrical charge in the capacitors, left inside the laptop. Also, ground yourself by touching any metal surface, or wearing a dedicated anti-static wrist strap to cancel-out any static charge in your body. And this goes for every time you are meddling with the internals of the device.
Here, if you need to remove an existing RAM stick, just push the edges of the clip holding it and it will pop-out. Try to avoid touching the bottom connectors as much as possible. And to put the new ones into the place, first, make sure you align the notch in the RAM module to the groove in the actual slot.
Now, place it in a roughly 45º angle and then use firm & even pressure on the top corners to push it into the slot. Remember, don’t force anything or you may end up damaging the RAM or the SO-DIMM slot. Once inserted, tilt the RAM until the metal arms snap into place, with a sharp “click” sound. Make sure the RAM stays flat, with the clips holding them securely.
#3. Improving the thermal performance
Maintaining a laptop’s temperature is a critical aspect of retaining a balanced performance. But with CPU & GPU getting denser than ever with tightly packed transistors and a high TDP, the boost in performance comes at a collective cost of excessive heat. Because the electric signal passing through the transistors in a processor dissipates heat, it is important that the heat remains in check. And if the computer fails to do so, the imminent overheating can result in issues like discomfort in usage, to even system failure. Hence, tending to improve thermal performance is crucial for an old laptop.
Efficient Cooling & Ventilation System
Laptops with a good cooling and ventilation system are usually impervious to such mishaps. However, not every one of them is manufactured the same way. Companies find ways to cut corners in areas like this to bring the laptop’s price down – and it’s a gateway to thermal throttling. It refers to the safety mechanism of a processor, where performance is sacrificed in order to match the inefficient cooling solution available in the device. You can prevent such problem by using the following techniques:
- Use a laptop/notebook cooler. It’s an external accessory with fans, that rests under the laptop to supply cool air to the air vent which is usually located at the bottom of the laptop.
- Set the battery performance level to the max; this will ensure that the fan is always running.
- Unplug the laptop when not required since the continuous supply of power can generate more heat
- Be aware of how you place the laptop, either on a flat surface or your lap. Ensure that the vent & the surface have enough space to cycle out the hot air, without getting trapped underneath.
- If possible, crank up the fan/s’ RPM (Revolutions Per Minute) setting for max performance. But remember, this will yield loud fan noise.

Though laptops with vapor cooling chambers are able to dissipate heat much more efficiently, it’s highly unlikely that older and inexpensive devices have it. Rather, such laptops come with a traditional heat pipe for flowing the hot air. In such cases, the aforementioned mentioned methods will definitely help towards efficient cooling. And even if your laptop has a solid thermal system, we recommend you follow those steps for maintaining the thermal performance anyway.
Clean out the dust!
Another reason why laptops overheat is because of the dust accumulation. With time, dust and dirt particles settle inside the device, which then goes on to block the airflow to and from the laptop. No matter how promising the “anti-dust” system your laptop may have, it is impossible to prevent dust from entering & eventually withering the ventilation.
Therefore, one must clean out the dust inside the laptop every once in a while, by using a mini vacuum and other tools. If you don’t feel confident enough to be performing such an intricate task, you can always give your laptop for servicing in a repair center which will set you back a couple of hundred rupees every time. One additional effective method to improve the thermal performance of your laptop is to re-apply the thermal paste.
Reapplying Thermal Paste
Here, a thermal paste (aka thermal grease/gel/compound, heat paste, etc.) is a semi-fluid thermally conductive substance. It is applied on top of the processor (CPU, GPU) or other heat-generating components, to eliminate any air-gap between the chip and the heatsink. With this, the heat sink is able to effectively transfer heat from the processor to the cooling system.
Every laptop comes with thermal paste pre-installed though its quality will differ between models. However, these dry-up after a while, thus crippling your laptop’s heat dissipation. As a result, you may need to re-apply it to improve the thermal performance of your old laptop.
Having said that, this is not a frequently required process like cleaning up. Provided that your device shipped with a decent thermal paste, you won’t need to replace it for a couple of years or even more. Nevertheless, if you encounter issues like overheating, thermal throttling, etc. it could be an indication of the necessity to do so.

Some popular manufacturers of thermal pastes include Thermal Grizzly, Cooler Master, Arctic, Noctua, etc. Besides the appropriate volume of the thermal paste itself, there are other factors to consider as well. For example, its composition greatly determines the success/failure of this little venture. So, unless you absolutely understand what you’re doing, this job is best suited for a professional.
#4. Installing a Linux distro
As a final Hail Mary to improve the performance of your old laptop, you can try installing a Linux distro. I know it’s a little daring one since you have to get used to a whole new Operating System (OS). I bet many of us have been using Windows from the very beginning. And it’s easy to understand how suddenly migrating to a different environment can be challenging. Add this to the fact that many popular programs like Microsoft Office, Adobe Photoshop aren’t natively available on the platform, though there is some workaround for them.
For instance, you can use the web version of Microsoft Office and install Photoshop using “Wine”, which helps run Windows applications on Linux and other operating systems. Or, just familiarize yourself with substitute products as there are plenty of them. Mind you, installing applications on Linux may be more than just clicking “Next” as we do on Windows.
Moreover, Linux is also open-source and absolutely free. You can choose to donate to the development team, but that’s not mandatory. And while Windows’ system requirement gets heavier with every iteration & update, Linux supports every generation of devices pretty well. The reason Linux so famous is also because of how efficiently it handles system resources, resulting in faster performance.
Specialized Linux Distro For Your Need
In addition, you can also find a Linux distro for your specific usage. For instance, if you’re a student, go with “UberStudent”. Or, if you’re into security, hacking and such, install “Kali Linux”, “BackBox”, etc. For regular usage, most common Linux distros include “Ubuntu”, “Linux Mint”, “Elementary OS”, etc. And in our case, there are several Linux distros targeted to improve the performance of old and underpowered laptops as well. Some of them include:
These distros are specifically designed with old hardware in mind and deliver great performance. Though it doesn’t magically improve the performance of your old laptop similar to the latest models, you can have a smoother workflow; compared to when the device ran Windows.

Finally, you should dual-boot Windows and Linux side by side so that you can easily switch between them when necessary. Dual-boot simply refers to installing two OS in a computer at the same time; and you can choose which OS to load upon boot. There are quite a few complications and risks to dual-booting Windows and Linux OS. So make sure you go through multiple tutorials on how to do it.
Improve performance of old laptop – A summary
| S. No. | Technique | Why? |
| 1 | Installing an SSD | Faster read/write speeds |
| 2 | Upgrading the RAM | Better multitasking of heavy apps |
| 3 | Improving the thermal performance | Preventing overheating, thermal throttling |
| 4 | Installing a Linux distro | A less resource-hungry substitute to Windows OS |


")
")
 in Nepal")


