DNS, or simply Domain Name System, is like the phonebook of the internet. When you type a URL like google.com or gadgetbytenepal.com, the DNS translates it into the IP address so that your computer will know where to go. What I mean by that is every device on the internet, and by extension every website on the internet, has its own unique IP address(es). Like "172.217.10.46" in the case of google.com. So instead of remembering those numbers, a DNS server makes it easier for us to get to the website we want.
Why does changing DNS matter?
The use of DNS is not just for finding the correct website. It has other uses as well, like affecting the speed, reliability, and security when browsing the internet. What it means is that some DNS servers will respond faster than others, making your website load faster. Not only that, but if one of the DNS servers is down, you can just switch to another, keeping your connection stable. And more importantly, some DNS even filter malicious sites or prevent tracking, which protects your device. Some of the most well-known DNS servers, due to their reliability, fast nature, and security focus are:
| IPV4 | IPV6 | |
| Cloudflare DNS | 1.1.1.1 | 2606:4700:4700::1111 |
| 1.0.0.1 | 2606:4700:4700::1001 | |
| Google Public DNS | 8.8.8.8 | 2001:4860:4860::8888 |
| 8.8.4.4 | 2001:4860:4860::8844 | |
| OpenDNS | 208.67.222.222 | 2620:119:35::35 |
| 208.67.220.220 | 2620:119:53::53 |
IMPORTANT: Changing DNS may not completely bypass government-imposed restrictions. It only improves how your device finds websites and connects to them.
Finally, how to change DNS?
For this part, we will be using Cloudflare DNS, as it is focused primarily on speed and privacy. Cloudflare claims that it never logs your browsing data. Not only that, it is used by a wide range of people and organizations around.
For Android users
| Note: Sometimes you may not be able to save the settings. This is because it requires you to enter your IP address. For this, simply type the IP address that you see in the box and save. |
|---|
For iPhone / iPad users
- 1.1.1.1
- 1.0.0.1
Step 5: Tap Save to apply the changes
For Windows 10 / Windows 11 PC users
Windows 10
If you're still on Windows 10, the process to change the DNS server is a bit longer. But it's pretty simple enough if you follow these steps:
- Preferred DNS server: 1.1.1.1
- Alternate DNS server: 1.0.0.1
Step 8: Click OK to save the settings Step 9: Go to Step 5 once again, and now double-click on Internet Protocol Version 6 (TCP/IPv6) Step 10: Enter the following values:
- Preferred DNS server: 2606:4700:4700::1111
- Alternate DNS server: 2606:4700:4700::1001
Step 11: Click OK to save the settings
Windows 11
| Note: If you're on an Ethernet connection, right-click on the Ethernet icon on the Taskbar and select "Network and Ethernet settings". Then, click on the "Ethernet" tab. |
|---|
Step 3: After that, click on the "Edit" button next to the "DNS server assignment" tab Step 4: Change it from Automatic (DHCP) to Manual, and enable toggles for both IPV4 and IPV6 Step 5: Now, under the "Preferred DNS" option, add the following DNS addresses:
- IPV4: 1.1.1.1
- IPV6: 2606:4700:4700::1111
For Mac users
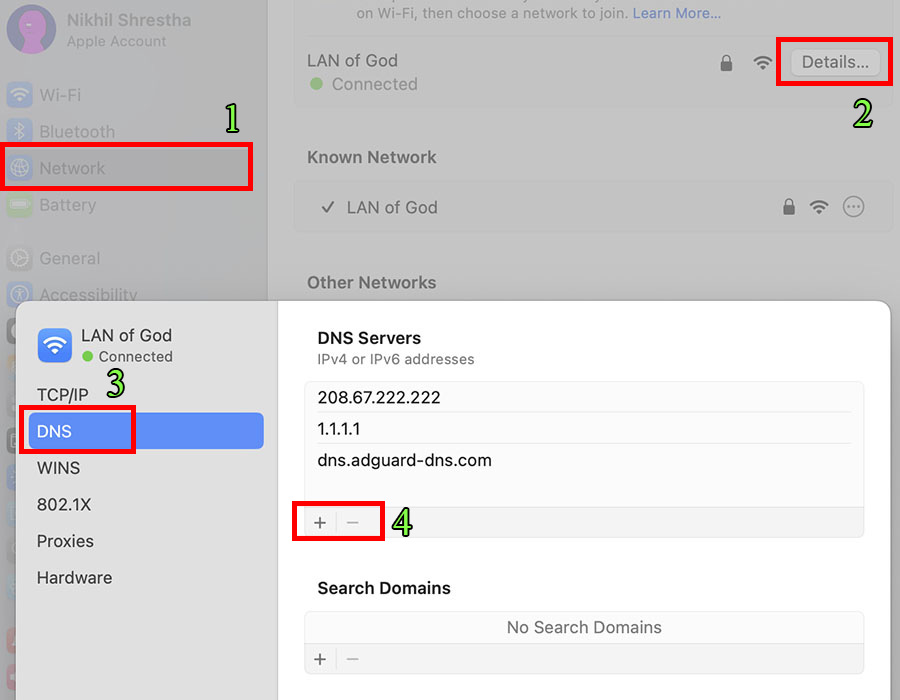
- IPV4: 1.1.1.1
- IPV6: 2606:4700:4700::1111
| Note: macOS doesn't have a separate input field for IPV4 and IPV6 addresses. |
|---|
Additional method
You can also use third-party apps from the Play Store or App Store that allow you to change the DNS server. The process is also quite simple: just download any of your preferred apps and add the "1.1.1.1" and "1.0.0.1" DNS servers. Moreover, you can also use VPN software to change to a different location for privacy, security, and secure connections.
Article Last updated: November 25, 2025