Why Trust Gadgetbyte?
At Gadgetbyte, we invest substantial hours into rigorously testing each product or service we review, guaranteeing that you make informed purchases. Learn more about our testing process.
Review Overview
4.6
The RØDE VideoMic NTG is an exceptional microphone that borrows the features from the company's professional NTG lineup into a smaller form factor. From USB-mic, safety channel, HPF, to live-audio monitoring, the RØDE VideoMic NTG proves its worth in almost every recording demands. Also praiseworthy are its battery life and build quality.
Design & Build
9/10
Audio pickup
9/10
Feature-set
10/10
Ease of use
9/10
Value for money
9/10
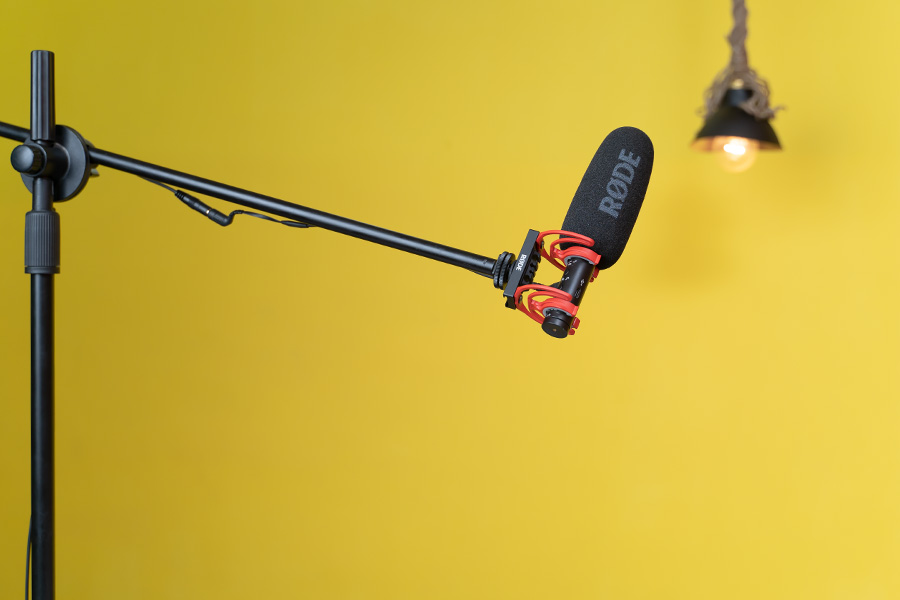
We live and breath video production here at Gadgetbyte and thus strive for the minutest possibility to make our videos better than ever. The thing is, we just don’t like compromising on quality; we’re stubborn that way. One of the most crucial and surprisingly overlooked prerequisites of video production is audio; the secret formula is consistency, people! Spending heavily on cameras and lighting, while skimping on a quality audio setup will do you no good. And speaking of a decent audio setup, we’ve been going back and forth with the RØDE VideoMic Pro and the Wireless GO for our production needs. While they do their job just fine, I want to reiterate what I said earlier – we want to get better, be it by a fraction or even less. It’s only so often that a new product at least “claims” to be absolutely revolutionary in its respective field. Walking on that course, the newly launched RØDE VideoMic NTG really piqued our interest. Yeah, they really made a hybrid microphone, bringing some neat features of the “NTG” professional lineup of shotgun mics inside a compact, and on-the-go form factor of a “VideoMic”. The VideoMic NTG is an on-camera shotgun microphone with broadcast-quality audio, USB mic functionality, and so much more. There’s going to be a slew of praise for this mic throughout the video, so brace yourselves.
RØDE VideoMic NTG Specifications:
- Body: 0.85-inches (diameter), 6.73-inches (length)
- Acoustic Principle: Pressure gradient electret condenser
- Polar Pattern: Supercardioid
- Frequency Range: 20Hz - 20kHz
- Frequency Response: 35Hz - 18kHz ± 3dB
- Output Impedance: 10Ω
- Signal to Noise Ratio: 79 dBA
- Dynamic Range: 105dB SPL
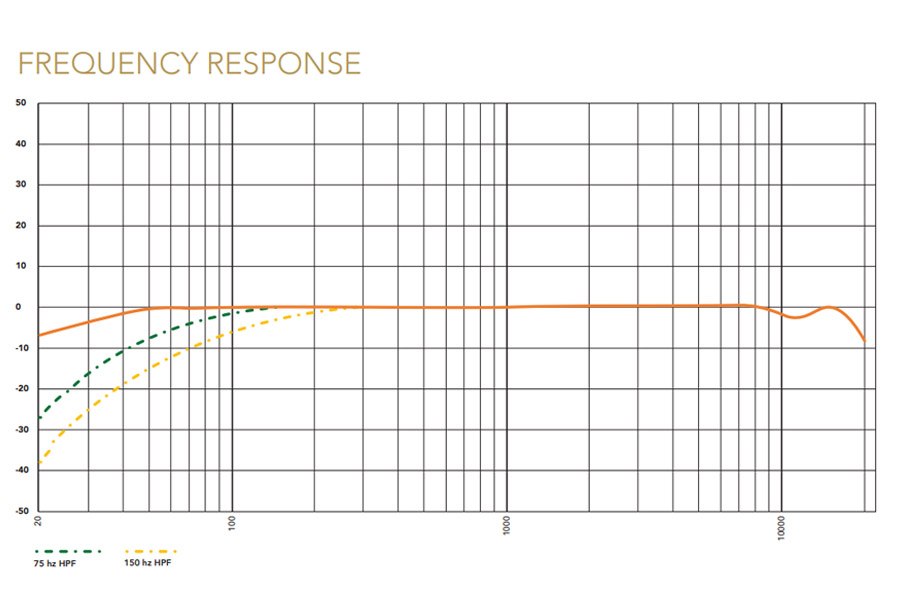
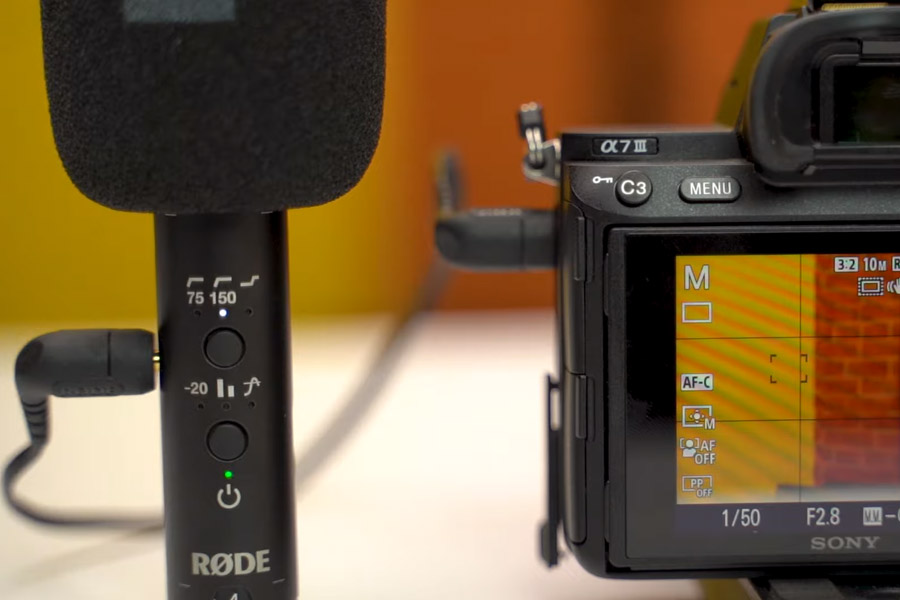
- High Pass Filter Frequency: 75/150Hz
- Battery: 350mAh, 30+ hours battery life
- Connectivity: 3.5mm auto-sensing output, USB Type-C, cold-shoe mount
- What's in the box: VideoMic NTG, SM7-R Camera Mount, Foam Windshield, SC10 Cable (3.5mm to 3.5mm), USB Type-C cable
- Price: $249
Cancel out the unnecessary noises with High Pass Filter!
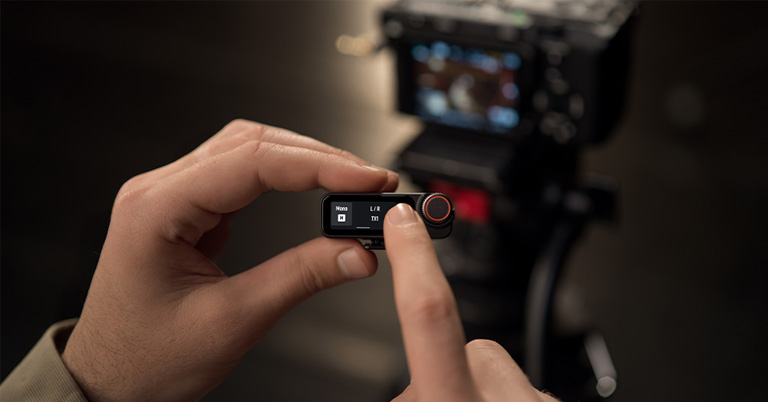
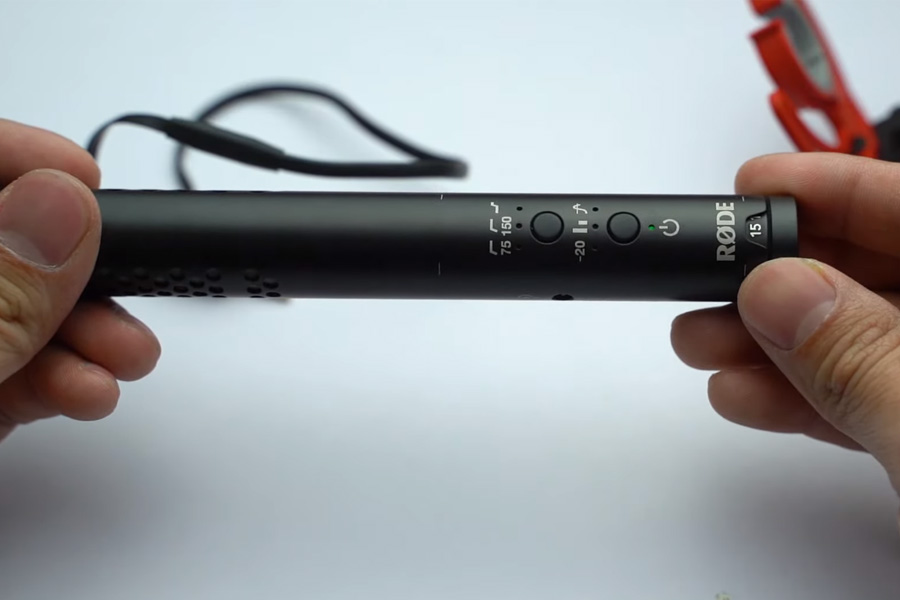
Starting from the top, the first button is for equalizer settings, which include high-pass filters and high-frequency boost. Here, you get the 2-stage high-pass filter (also called low-cut filters) at 75Hz and 150Hz, and what it basically does is filter out the low frequency sounds like rumbles, bass, HVAC (Heating, Ventilation, & Air Conditioning), and other forms of ambient noises from the recording. The 75Hz option means that the VideoMic NTG will attenuate all frequencies which are 75Hz or below, and the 150Hz does the same for audio frequencies at 150Hz or below.
High-Frequency Boost
What this feature does is, as the name implies, boost the frequency by about +6dB. This is useful in enhancing the detail in the subject’s voice, who is speaking directly into the microphone in a noisy setting or to counteract muffled audio due to the use of a foam windshield or other anti-wind accessories.
Passive Attenuation Device (PAD)
Moving down, you have the power/function control button for power, PAD switch, and safety channel. You can turn on the -20dB PAD switch by a single click, which lowers the mic’s sensitivity in order to avoid clipping or distortions in a high-noise scenario. It can also come in handy when you’ve set up your mic to a certain secondary sound source, and you don’t want it to shadow the intensity of the primary audio source. For this, we set up the VideoMic NTG and the VideoMic Pro onto two cameras. The VideoMic Pro was directed to the subject (here, the singer), while the VideoMic NTG with -20dB PAD turned on was boomed directly below the guitar.
Safety Channel - for... safety
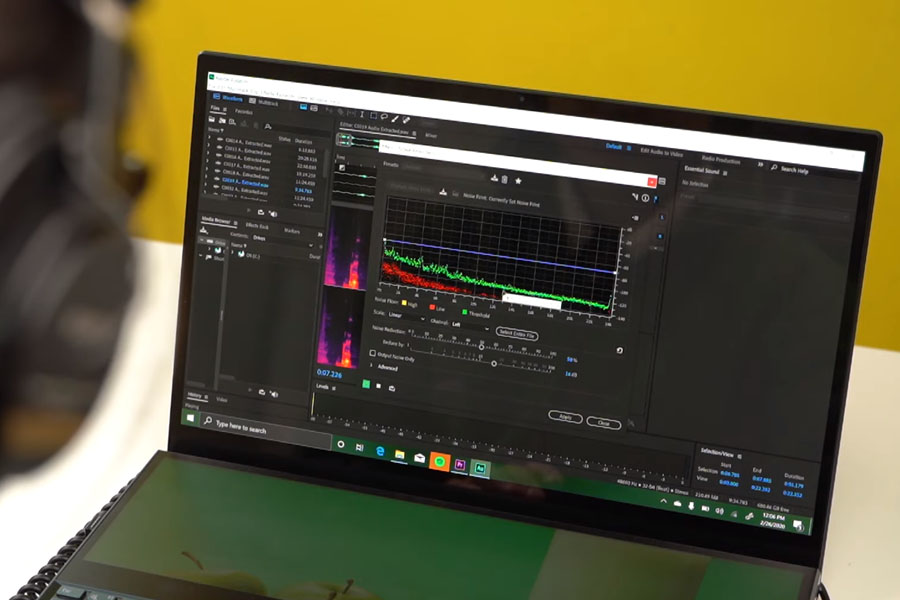
Another click allows you to toggle on the safety channel. And like the high-frequency boost, it can also be used discretely or simultaneously with the -20dB PAD. This nifty feature records a separate channel at 20dB quieter on the right channel, which can be used as a backup in case the main channel suffers from clipping. In our case, we tried it out when recording in a nastily noisy outdoor situation with the gain dial set at 10. As expected, there were distortions in the audio, but remember we’d ensured of a backup. In our digital audio workstation (we use Adobe Audition), we were able to extract the audio recording into two separate mono channels – one on the left, and the other on right.
clipping basically refers to when the audio signals get distorted because they are just too loud to be processed by the amplifier.
It powers on automatically!
Another handy feature this mic has is the auto-power function. This means that it powers on automatically when plugged into a supported device, but you can also long-press this button for about 3 seconds to turn it on if that’s your thing.
Battery
The battery life on this thing is ridiculously amazing. RØDE promises over 30 hours of continuous recording and frankly, we haven’t walked that line yet.
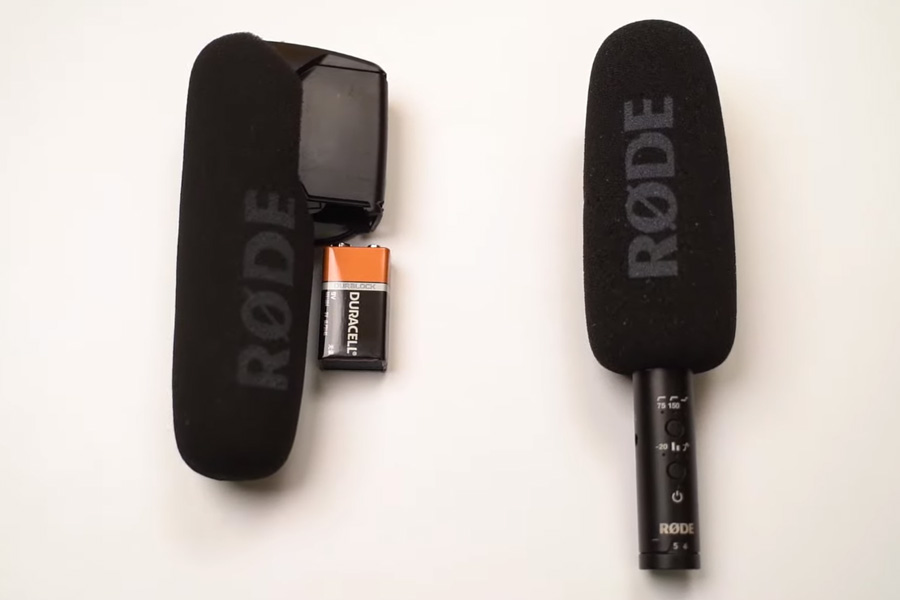
RØDE VideoMic NTG is also a USB-mic, people!
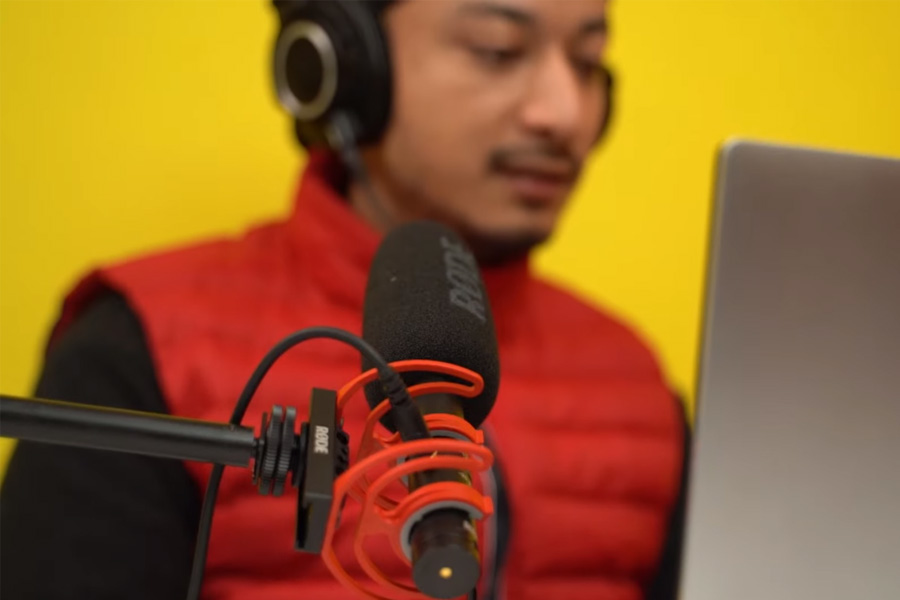
Besides charging, the VideoMic NTG also turns into a fully functioning USB microphone by plugging into a computer, tablet, or a smartphone with a Type-C cable. This is one of the standout features of the mic, which lets you easily record podcasts, voiceovers, etc. at the simplicity of a plug-and-play device, without having to bother with any complicated audio setting. The recording’s quality is fantastic and as a result, this mic just changes the game altogether. You can easily record podcasts, voiceovers, attend meetings, etc. at the simplicity of a plug-and-play device, without having to bother with any complicated audio setting. Moreover, you can monitor the audio in real-time by connecting a headphone to the 3.5mm output.
Auto-sensing 3.5mm output, aka, no more adapters!
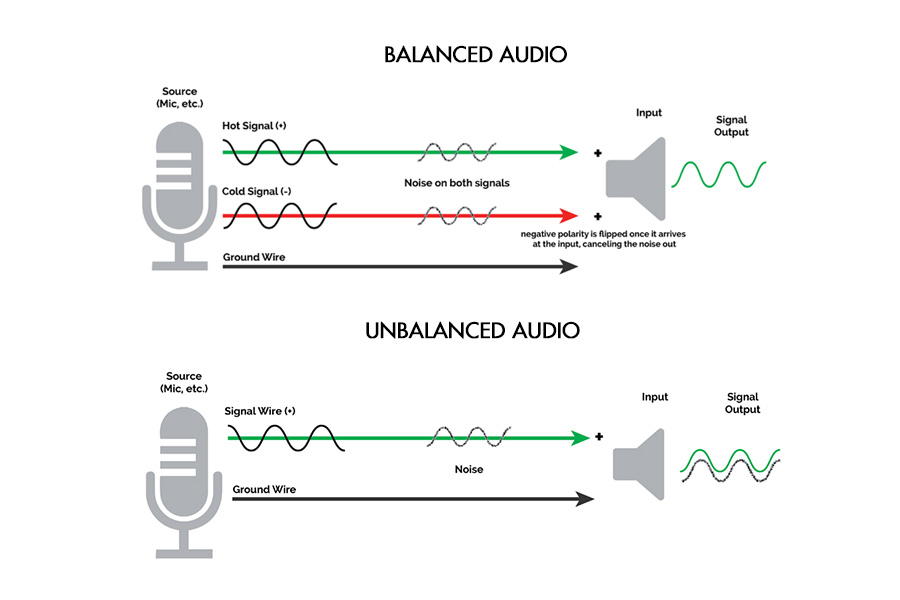
Furthermore, there’s the auto-sensing 3.5mm TRRS output, which intelligently switches between TRS and TRRS output depending upon the connected device, eliminating the need for any sort of adapter. And like I said before, the 3.5mm output on the VideoMic NTG also lets you monitor the recording in real-time by connecting a headphone, and then use the gain dial to adjust the volume. But mind you, this output is unbalanced and RØDE doesn’t allow the use of an XLR adapter for balanced audio output. Well, you have to keep some features reserved for the expensive NTG lineup, I guess. That’s not something gravely alarming though. The balanced output is less susceptible to any probable noise from various electrical and radio interferences like lighting, power cables, etc. and allows comparatively long-distance signal transmission.
Variable Gain Control
Now let’s finally talk about the gain dial on the rear of the VideoMic NTG. This “infinitely variable gain control” allows you to adjust the mic’s output from “mic” to “line” to “headphone” level output in real-time. Ranging from 1 to 15, this gain control knob is more versatile than the options on other microphones out there since most of them only come with a fixed level of gain settings. For example, the RØDE VideoMic Pro only supports -10, 0 or +20dB of gain control.
Final Words
You may now be asking yourself “Woah, they sounded nearly identical. So, what’s the point of getting the expensive VideoMic NTG?” In all fairness, you’re right. There definitely isn’t any drastic difference in audio pickup between the two mics, though the superiority of the VideoMic NTG becomes apparent upon closer inspection. However, the primary selling point of it is definitely its versatility. The variable gain control, safety channel, real-time audio monitoring with 3.5mm audio output, and most importantly the ability to use it as a USB-mic makes the RØDE VideoMic NTG a damn impressive microphone.
RØDE VideoMic NTG - Pros & Cons
Pros:
- Great audio pickup with its supercardioid polar pattern
- Amazing battery life with auto-power function & robust build quality
- Can be used as USB-mic with live-audio monitoring
- Bunch of useful features like HPF, Safety Channel, PAD switch, etc.
Cons:
- No balanced audio
- A little expensive than the competition (e.g: Deity V-Mic D3 Pro)
Article Last updated: November 23, 2025