Want to upload pictures in your PC to Instagram? Here’s how you can do it

how to upload pictures in your PC to Instagram
Honor X9b Ad
Honor X9b Ad

There may be times when you find a beautiful picture on your computer and think of sharing it on your Instagram. But when you log in to your Instagram account from your PC, you see that there is no upload option available! Now you might look around for your USB cable to transfer it to your phone, or, simply leave it be as you don’t want to go through the extensive process of copying the picture on your phone. Then, you lament over the lack of options you have and decide, the picture will never be showcased to the world.

But not anymore. There are some “hacks” – don’t worry, you won’t have to hack your computer – to do this. Here, I have listed some options you can use to upload your pictures on Instagram using your PC.

Using browser developer mode

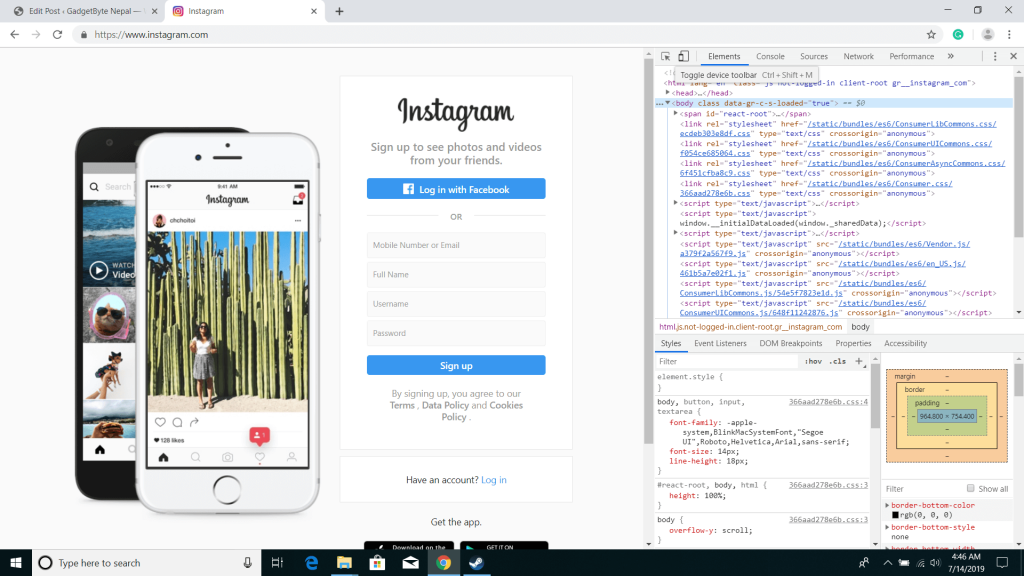
In my opinion, it is the best way to upload pictures to Instagram on PC. It does not require any kind of extensions and is relatively easy for an average PC user.

The initial step is to log in to your Instagram account using your browser then enter the browser’s developer mode. The steps to access the browser’s development mode may vary according to your browser.

Chrome: F12 or three dot menu > more tools > developer tools                                        Firefox: Three-line menu/hamburger menu > web developer > toggle tools                    Opera: Menu > developer > developer tools                                                                    Microsoft edge: F12 and then choosing emulation from the arrow pointing downwards

browser developer mode for instagram

Now that you have activated developer mode, your browser window along with Instagram should look like the one in your mobile app. As of now, you should also see some familiar signs accompanied by the plus (+) sign, if not press reload button.

Hit the plus sign and the standard File Explorer will pop up. This will allow you to choose an image or video from your PC to upload to Instagram.

Using BlueStacks Android Emulator

An Android emulator is a program that lets you run Android apps on PC. So basically, you are running the actual Instagram app on your computer.

BlueStacks is one of the most popular Android emulators available, so download and install this app on your PC. Now you can download the Instagram app to your PC using the BlueStacks access to Play Store.

Once you’ve installed the Instagram app, open it from BlueStacks home screen. From here you can follow the identical approach to uploading photos from your phone. However, Windows file explorer will pop up instead of your phone’s gallery app.

Using the Windows 10 Instagram app

Windows has an Instagram app available in the Windows store. But apparently, Instagram has restricted uploads to Windows 10 devices with touchscreens only (eg. convertibles and tablets). However, it is still possible to find and use the app’s upload functionality regardless of the screen type.

Start by searching for Instagram in the Windows 10 search bar next to the start or Windows Button. Search for Instagram in the search bar then select the new post to open a very rudimentary file picker. This doesn’t activate the Windows file explorer, however, serves up a few folders like Pictures, Downloads, Saved Pictures, Camera Roll.

Nevertheless, if you are not seeing the new post functionality when searching for Instagram in the search bar. Right-click on the app and choose pin to taskbar. Further, right-click the pinned Instagram icon and you should see new post option. Click this and you should see the aforesaid file picker which allows you to start the upload process.

However, you can only upload pictures from the default Pictures folder on C: drive. So, make sure to move your desired picture to that.

So, there you have it. Maybe you don’t really use Instagram on your PC, but hey, if you happen to find that cute photo from your DSLR in your PC, then, this is the way to go!