Samsung had a rough start with foldable smartphones as the original Galaxy Fold ran into several problems. However, the company has turned things around as it has refined the technology in the Galaxy Z Fold 2 and Galaxy Z Flip. The focus is now on rollable / sliding smartphones. Companies like TCL, LG, and Oppo are all working on similar technology. And now, it has been confirmed that Samsung is working on smartphones with rollable or sliding screen as well.
Samsung Rollable/Sliding Screen Smartphones
The news was first reported by The Elec, a South Korean media outlet that focuses on the tech industry. According to the report, Samsung Display has confirmed that the company is developing on rollable and slidable smartphones. These new form factors are what the company believes will help it expand its leadership in foldable technology.
As of now, Samsung has already foldable smartphones in two different form factors – Fold (Galaxy Fold, Galaxy X Fold 2) and Flip (Galaxy Z Flip). The introduction of smartphones with rollable and foldable screens will expand the company’s portfolio of foldable smartphones. As a result, customers will have more form factors to choose from.
We are yet to see any official renders or live-images of Samsung rollable/sliding screen smartphones. However, LetsGoDigital published some renders of the said phones based on what they would look like.
Source: LetsGoDigital
Last year, it was TCL that shared its concept of rollable/sliding screens. Then there was news of LG, the brand behind the T-shaped Wing phone, working on similar technology. The company also teased the technology in the CES 2021. Oppo has also showcased a working prototype of the technology in Oppo X 2021.
Samsung may be looking to beat all these brands in integrating the technology in commercial smartphones. The company is looking to launch phones with new form factors later this year.
Other Display Trends in 2021
Also, the company has announced that it will still be developing LCD panels. If you remember, it was announced last year that Samsung Display will stop production of LCD panels by the end of 2020 in favor of other display technology. Since its clients are still using LCD panels, the company will still produce them at their request.
The company will also be promoting its OLED panels. Samsung is working on making OLED work with variable refresh rate and tweaking it to consume less power. In addition to smartphones, Samsung will also be shipping OLED panels to notebook and laptop manufacturers. Samsung will also push its Quantum Display to premium TVs.
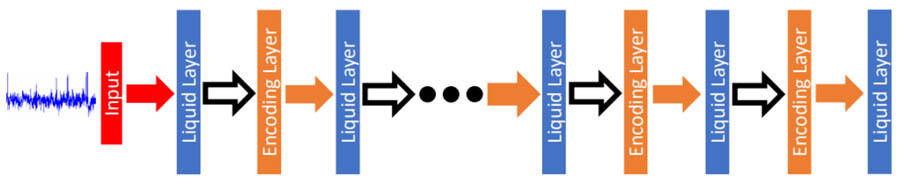
Researchers at MIT have developed a new kind of neural network called liquid networks. Unlike the traditional liquid networks, the new liquid neural network is dynamic and can adapt to new inputs. In this post, we will talk about the new liquid neural network. We will discuss its architecture, advantages over the traditional models, and possible applications.
Introduction to Artificial Neural Networks
Before getting into the complexity of the new neural network, let’s talk about Neural Networks. Artificial neurons are programs/algorithms that act like biological neurons. In the field of computing, a neuron is a mathematical model of function that takes weighted inputs, sums them, and activates them before sharing the results with other networks. By feeding the artificial neuron with the input of different weights, we can train it for our desired result (or output).
An artificial neural network is a complex structure of different layers of neurons. There are multiple connections between neurons in the network and an input passes through these neurons multiple times before the network outputs a final result. An output of a neuron is input to other and all the neurons help in refining the input for the ultimate output.
A neural network is modeled and trained depending upon what kind of output is expected from it. As of now, neural networks have been successfully used in prediction, autonomous systems, and recognition tasks.
Liquid Neural Network
Fundamental Difference
The limitation in the neural networks prior to the liquid neural networks is their training data set. What that means is the complete behavior of the network including how it responds to certain inputs is firm. As a result, neural networks are not flexible enough to change it based on the real-time inputs.
In contrast to this, the liquid neural network is flexible. The underlying equation can change in accordance with the new inputs. For this, researchers have changed the differential equations that represent the neuron. These new neurons can change parameters based on the results of the equations. As a result, the new networks are dynamic in nature.
In the test, the new neural network bettered other time series algorithms by few percentages in prediction tasks. The neural network also has smaller and fewer computing nodes. The researchers believe that the few yet richer nodes in the liquid neural network will scale down the models.
Applications
The new neurons will have a great impact on how we process time-series data. Researchers believe the world is all about sequences. This includes our perception of the world too. Our reality is full of time-series data. Thus, with improved time series data analysis, we can develop future technologies.
The liquid neural network can anticipate future behavior in the system by analyzing data in real-time. This will be very helpful in systems that need to make decisions based on real-time data input. Thus, we could see the use of liquid neural networks in medical diagnosis and self-driving vehicles.
Check out our review of the Samsung Galaxy Buds Pro.
WhatsApp has been a hot topic of discussion for the past few weeks. The messaging platform was drawn to public criticism because of its latest privacy policy update which makes it compulsory for users to agree to share data to WhatsApp’s parent company Facebook. After delaying the implementation, the company has now integrated biometric authentication in its web and desktop app for extra security to WhatsApp web. Let’s learn more about WhatsApp’s latest security feature.
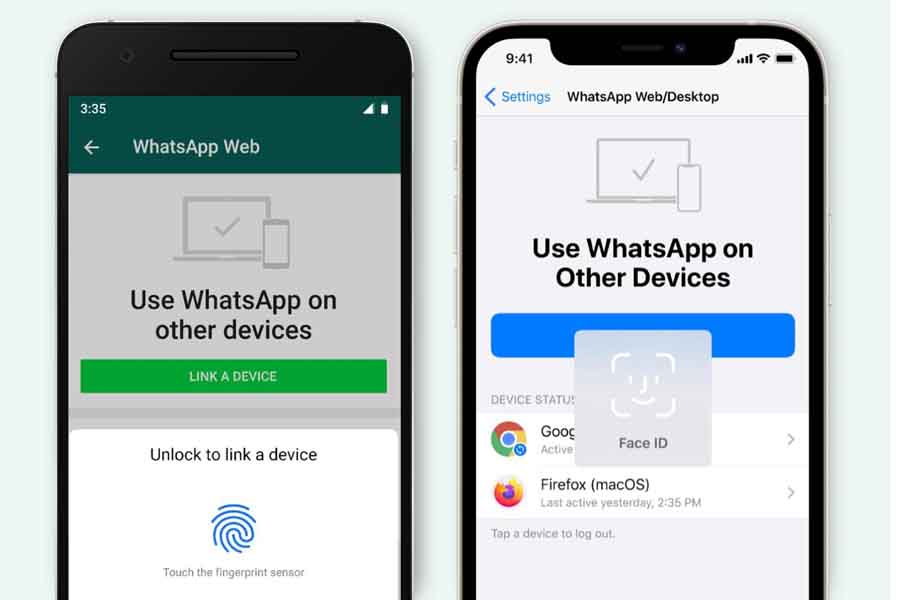
Biometric Authentication in WhatsApp
The latest security feature of WhatsApp tries to minimize unauthorized login into web and desktop app. Prior to this, users needed to pass through the QR code authentication to log into their WhatsApp account via web and desktop client. You could do it by selecting the WhatsApp web/desktop option from the phone and scanning the QR code from the desktop.
Process
WhatsApp has not removed the QR authentication – it is still here. What the company has done is introduce biometrics integration as an additional layer of security. With this, users need to go through biometric authentication when they choose the WhatsApp Web/Desktop option on their phone. Depending upon the phone, user can use their Face ID, fingerprint, or Iris ID. Only then they will be promoted to QR authentication to complete the linking process.
Security Concern
The feature will work with all Android phones with biometric authentication. For iPhone users, the feature will work with devices running on iOS 14 and above. WhatsApp has clarified that the biometrics authentication is by the device’s operating system. What this means is that the authentication is done by the OS using the biometric stored in the OS. Thus, WhatsApp doesn’t have access to the biometric information of the user.
Future Plans
The new feature is only a step in enhancing the desktop/web experience. At present, many of the app’s features are not available in the web and desktop versions. The company is looking to bridge the gap between phone and desktop app. For instance, the call feature has been introduced in the latest beta version of the desktop app.
So, what do you think of the new security feature in WhatsApp? Are you still using WhatsApp or have moved on to its alternative? Let us know with your comment.
Check out our take on WhatsApp’s latest privacy policy [Nepali].
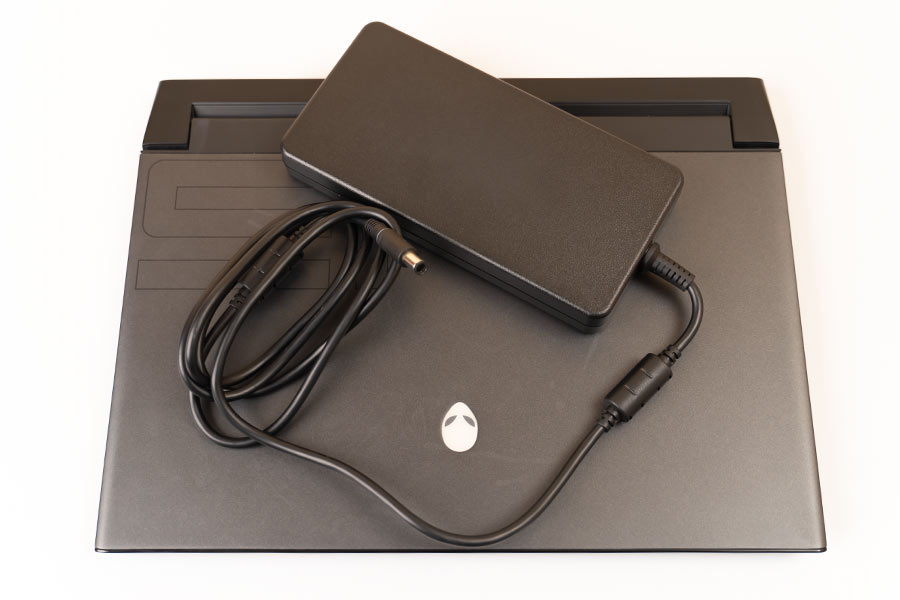
Dell’s Alienware series is known for offering spec-heavy laptops that deliver brilliant performance. Furthermore, they also sport a futuristic look that is enough to label them as a gaming laptop. The Alienware m15 R3 is the third iteration of this series. Its design is still similar to that of the last year’s m15 R2, but this updated version brings much more than just your usual processor upgrade. So without further ado, let’s dive right into our review of the Alienware m15 R3.
GPU: NVIDIA GeForce RTX 2070 SUPER, with 8GB GDDR6 VRAM
RAM: 16GB DDR4 @3200MHz
Storage: 512GB SSD PCIe M.2 SSD
Ports: 2 x Type-A USB 3.1 Gen1, 1 x Type-A USB 3.1 Gen1 with PowerShare , 1 x Alienware Graphics Amplifier, 1 x HDMI 2.0b, 1 x Mini-Display, 3.5mm headphone jack, 1 x Thunderbolt 3 with DisplayPort 1.2 support, 1x RJ45
Connectivity: Killer Wi-Fi AX1650 (2×2) 802.11ax + Bluetooth 5.1
Keyboard: Alienware mSeries keyboard with per-key RGB LED AlienFX lighting
Battery: 6-cell Lithium-Polymer Battery
Price in Nepal: Rs. 310,000
Alienware m15 R3 Review:
This laptop is really spec-heavy. You can configure it with a 10th Gen Intel Comet Lake H-series processor and bump up the GPU up to NVIDIA RTX 2080 Max-Q. The display options that you have are 144Hz, 300Hz, and a 60Hz 4K OLED. For deeper colors you can go for the 60Hz panel one, but hey if you are all in for gaming a faster refresh rate is preferable.
Our review unit of the Alienware m15 R3 comes with an Intel Core i7-10750H processor, RTX 2070 SUPER GPU, 16GB RAM, 512GB PCIe M.2 SSD, and a 300Hz refresh rate screen. This one does not have the Tobii eye-tracking. If you want that, you’ll have to go for the 4K OLED variant.
Design & Build
Minimalistic yet gaming aesthetic
Smudge-resistant back panel
Lightweight for a gaming laptop
So, talking about the design, nothing much has changed from last year’s model. M15 R2 had a superb design, so it does make sense that Dell has decided not to go for a complete design overhaul this time around.
It retains a minimalistic aesthetic although there are enough lighting fairs that help it retain a gaming laptop vibe. There are two color options: the white Lunar White one and the off-black Dark Side of the Moon. Our review unit is the latter one.
Traditionally, a black chassis meant that you’d have to deal with a lot of fingerprint smudges. However, the exterior makes use of a high endurance clear coat finish to help reduce smudge attraction. You do get some from time-to-time, but it is just a minor issue.
Sticking to the chassis, it isn’t metal, rather the keyboard and the lid are made up of glossy plastic. The lid contains a small LED-lit Alienware logo and a “15″ marking towards the bottom right. Similarly, the rear part, which houses an air vent and a few ports is made up of black matte plastic.
Honeycomb vent
Underneath, you’ll see the bottom vents in a honeycomb pattern. All the air-vents besides the bottom one i.e the rear one and the one above the keyboard deck are in a honeycomb pattern.
The rear part is extended and contains air vents which result in better cooling. However, it does come at a cost of increased size. An LED strip also surrounds the rear vent whose lighting can be controlled from the Alienware Command Center.
The Alienware m15 R3 weighs around 2.1kg and measures 14.2 x 10.9 x 0.8-inches. It is lighter than most competitors such as the Helios 300 and the ROG Scar G15. Thus, you can easily carry this laptop around for your daily commute.
Overall, the design is pleasing to the eye, fits in perfectly in any environment yet retains its gaming vibes. What more can you ask for, right?
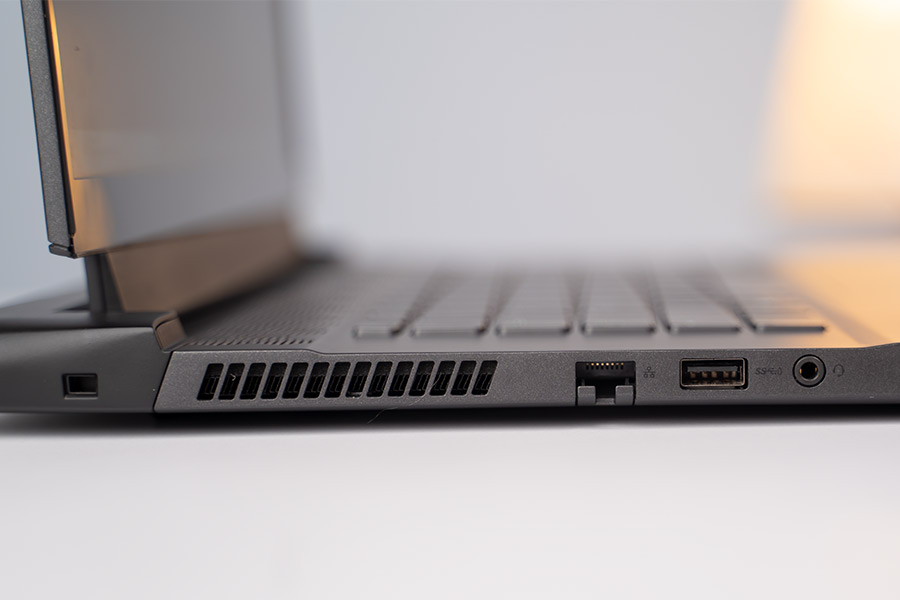
Ports and Connectivity
Great port selection
WiFi 6, Bluetooth 5.1
This laptop has a huge selection of ports. On the left, there’s a USB 3.1 Gen 1 Type-A port, RJ45 port, 3.5mm headphone jack, and a noble lock socket. Similarly, on the right, there are additional 2 USB 3.1 Gen1 Type-A ports and a MicroSD slot. The MicroSD slot was missing on the m15 R2, so it is a much-welcomed comeback.
Left
Right
The ports don’t end here. At the back, you have the AC adapter, an HDMI 2.0 port, a mini Display 1.3 port, and a Thunderbolt 3 with USB-C charging port. Furthermore, there’s an Alienware Graphics Amplifier port too.
One neat thing about the AC adapter is that, once you plug it in the charging wire lights up. And that gives a neat touch to the laptop. For communication, the laptop has the Killer AX1650 for Wi-Fi 6 and Bluetooth 5.1.
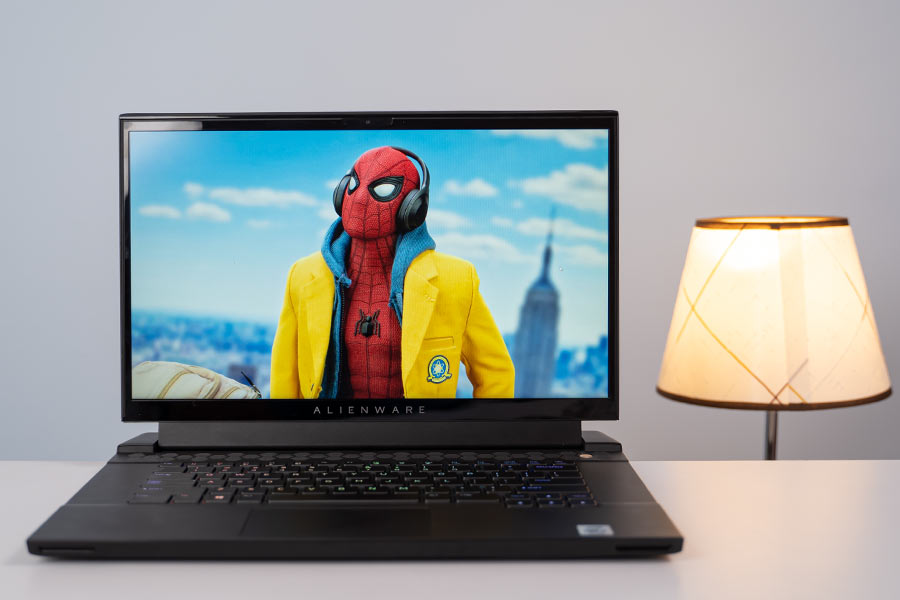
Display
1080p (FHD) IPS panel with 300Hz refresh rate
100% sRGB, 77.4% DCI-P3 color gamut
You get a 1080p 300Hz panel that is surrounded by thin bezels on the side. The upper one is slightly thick in order to house the 720p webcam, which is average at best and the bottom bezel contains the Alienware label. The whole screen is elevated a bit higher on the hinges and the screen can be pushed back up to a maximum angle of about 140 degrees.
The panel itself is a peach. The colors pop-out quite well and everything seems so vibrant. You probably won’t require the 300Hz refresh rate while doing general tasks so better switch it to 60Hz to save some juice. However, its true potential is reflected while playing high FPS games and I am sure gamers will appreciate it.
There is a bit of backlight bleeding, but that differs from unit to unit. Furthermore, the screen is not that bright either. The peak brightness is 300nits and I did have a hard time using it outside on a bright sunny day. The 60Hz 4K OLED variant would fare far better in that scenario.
Color coverage
If you are looking to do some content creation on this laptop, then that’s fine too. This panel covers 100% of the sRGB color gamut, about 64% of the Adobe RGB color gamut, and 77.4% of the DCI-P3 color gamut. So, it’s a fairly color-accurate panel. On par or even better than some of its competitors such as the Zephyrus M15. But if you want a more color-accurate screen, the Zephyrus G14 is the one to go for.
Keyboard & Trackpad
Island-style RGB-backlit keyboard, 1.7mm
Trackpad with Windows Precision Drivers
Coming to the keyboard, it is an island-style keyboard with an RGB backlight. The lighting can be configured from the Alienware Command Center. However, the keyboard itself does not have a dedicated key to launch the command center. Just above the main key-deck, there’s a power button shaped in the form of an alien head, and it lights up too. Moreover, if your battery level gets critically low, the lighting on the alien head starts to flicker, so that even if you’re immersed in a game, you do get notified about the battery levels.
The keys are well spaced and offer 1.7mm key travel. Typing is a joy on this one. Perfect for everything, but the keys do get quite warm while gaming. So, that’s a concern. Other than that, there’s nothing much that I have to complain about this keyboard.
The trackpad is placed just below the Spacebar. And I felt it to be a bit small to my liking. I got used to it after a while, but still, it somewhat bugged me. However, thanks to the size of the trackpad, you get enough space for palm rest on both sides.
The trackpad itself comes with Windows Precision Drivers. Gestures and pinch-to-zoom were not a problem. However, I did find the two-finger scrolling to be somewhat inconsistent. So, I saved myself the irritation of the inconsistent scrolling by using a mouse. Which you’ll probably use while gaming anyway.
Alienware Command Center
Control lighting, overclock, etc.
You can launch the Alienware Command Center from the Start menu. The command center allows you to control the lighting of the keyboard, the alien head on the lid, and the LED strip in the rear. Moreover, you also get to tweak the Overclock, thermal, power, and sound profiles.
The Home tab gives you an overview of your current system settings and you can easily choose a theme, thermal profile from the home tab itself. In the Library section, you can add games and customize settings for each of them. I highly recommend you to do that, ’cause there’s isn’t a dedicated button on the keyboard to boost fan speeds. So, you should adjust the things such as the thermals, audio, and power profiles from there itself.
The FX tab allows you to change the lightings. To adjust the lighting effects for the keyboard select the Advanced KB option and to adjust the lightings of the alien head and the Tron, select the Alienware m15 R3 option.
Finally, in the Fusion tab, you can tweak the Overclock, thermal, and power profiles. You can go to the Advanced View option besides the GPU overview to change the power limit, thermal limit, core clock speed, and memory clock speed. You can change the existing ones or create your profile.
Similarly, you can also change the thermal profiles between balanced, performance, cool, quiet, and full speed. You select the one as per your need. Lastly, I also suggest you tweak some of the power management options as you are really going to need them on this laptop.
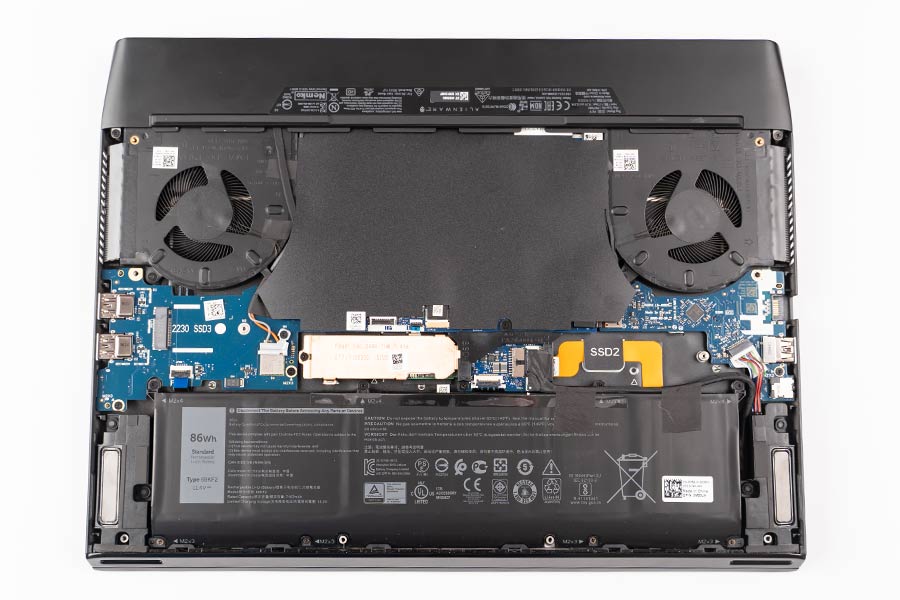
Upgradability & Performance
Intel 10th-gen Core i7-10750H CPU (6C/12T)
NVIDIA GeForce RTX 2070 SUPER GPU
16GB DDR4 RAM and 512GB M.2 NVMe SSD
Here, the 10th Gen Intel Core i7-10750H processor coupled with 16GB of RAM handles everything that you throw at it with perfect ease. This one has a 6-core processor however, in the international market you can get an unlocked 8-core i9-10980HK processor.
However, the i7-10750H is no slouch either. It scored Single Core 440 in the Cinebench R20 test. It is well over the standard 200 benchmarks for gaming laptops.
Upgrading the laptop is pretty easy. You just need to open the 8 screws in the bottom and bam you’re inside. Once inside, you’ll notice that the RAM is soldered onto the motherboard so you can’t really upgrade it. The SSD slots are covered with heat sinks and thus you’ll need to remove them to add extra storage.
For storage, our review unit comes with a single 512GB NVMe SSD. Its performance is pretty good which you can see from the CrystalDiskMark scores. It has good sequential read/write scores too. So, don’t worry about the speed of this laptop.
Running demanding applications on this laptop is no trouble either as it can handle pretty much everything that you throw at it. I have been using this laptop for a significant amount of time at this point, and not once did I notice any sort of lag or stuttering. Rest assured, you can easily use this laptop for any sort of task.
Gaming
Coming to the gaming performance part, as I mentioned earlier, this review unit of Alienware m15 R3 is equipped with the NVIDIA RTX 2070 SUPER GPU. That along with the i7-10759H CPU is a deadly combination. Add to that the 300Hz panel and you are good to go for casual to competitive esports.
I played a few games in laptops Turbo mode i.e fans at full speed and GPU overclocked and the results are as follows:
Alienware m15 R3: FPS stat in various games
Ultra
High
Medium
The Witcher 3: Wild Hunt
100
132
142
Battlefield 5 (DXR off)
123
148
164
Battlefield 5 (DXR on)
78
93
110
Far Cry 5
118
123
126
Shadow Of The Tomb Raider
62
70
95
CS: GO
242 (very high)
323 (medium)
You can see from the stats that in each game you’ll be able to get very high fps. The laptop did struggle a bit while playing Shadow of the Tomb Raider, however other games were a breeze for it.
In normal titles the 300Hz won’t really make much of a difference, however, while playing FPS games such as CS: G0, you’ll see its full potential.
Thermals
Improved cooling solution
Vapor cooling chamber
Alienware M15 R2 was plagued by heating issues, so to solve that Dell has tried to improve the thermals on the m15 R3. This one comes with 39% more copper and 25% more fan blades than the R2; thereby resulting in 10% greater CFM air intake. Furthermore, it also integrates a vapor cooling chamber.
The vapor chamber does impact the cooling as it helps to keep the temperature low while doing normal tasks. You can bump up the fan speed while gaming, but be wary, at max speed, they get extra loud.
However, I am still not satisfied with the cooling on this device. I kept my fans in a balanced mode while web surfing because obviously, I would not want to be disturbed by the fan noise while reading blogs. But it resulted in the bottom panel getting heated somewhat quickly.
While gaming and doing the heavy-duty stuff, the keyboards tend to get pretty warm. And after about 30-40 minutes you might even start to feel uncomfortable using it. However, I was overclocking the GPU so that might have also led to a higher temperature. Furthermore, the fan noise was disturbing too.
You can game in balanced or performance mode without overclocking and get rid of the fan noise. But I did not want to sacrifice the performance level. Overall, the thermals have improved, but there’s still a lot to do in this department.
Speakers and Battery Life
4-way (woofer/tweeter) stereo speaker system
6-cell 86Whr Li-Ion battery
Alienware m15 R3 has a 4-way woofer with a stereo speaker design. They are located near the front of the laptop. The speakers are sufficiently loud. But at high volume, the details get a bit distorted. Then again you have to have the speakers at full volume while playing games with fans blasting at full speed. However, when the fans are not at full speed you’d probably not need any headset. Still, the palm rest starts to vibrate once the sounds get loud. No problem while gaming, but you might want to tone down the volume while typing.
Getting to the batteries, the laptop has a 6-cell Li-ion battery. It is a sub-par battery as it lasted just below 3 hours when simply web surfing at about 75% brightness. The numbers get even lower while gaming. But the catch is that the 300Hz panel exclusively uses the RTX 2070 SUPER graphics. So, you should tweak around with the settings or get the 144Hz variant for a better battery backup.
Verdict
All in all, as I’ve uncovered throughout this review, the Alienware m15 R3 is an excellent gaming laptop. It has good hardware and runs everything like a breeze. However, it is marred by lackluster battery life and despite an improved cooling system, the keyboards tend to get warm quickly when overclocked. But the heating issue can be resolved by tweaking around with the Overclock settings.
I really liked the design of the laptop and its overall performance. And I would definitely recommend this laptop to anyone looking for an excellent gaming laptop. Yet, given how laptops powered by the newer NVIDIA RTX 30 and AMD Ryzen 5000 series of mobile processors are right around the corner, maybe wait a while longer to get those instead.
Check out our video review of the Alienware m15 R3.
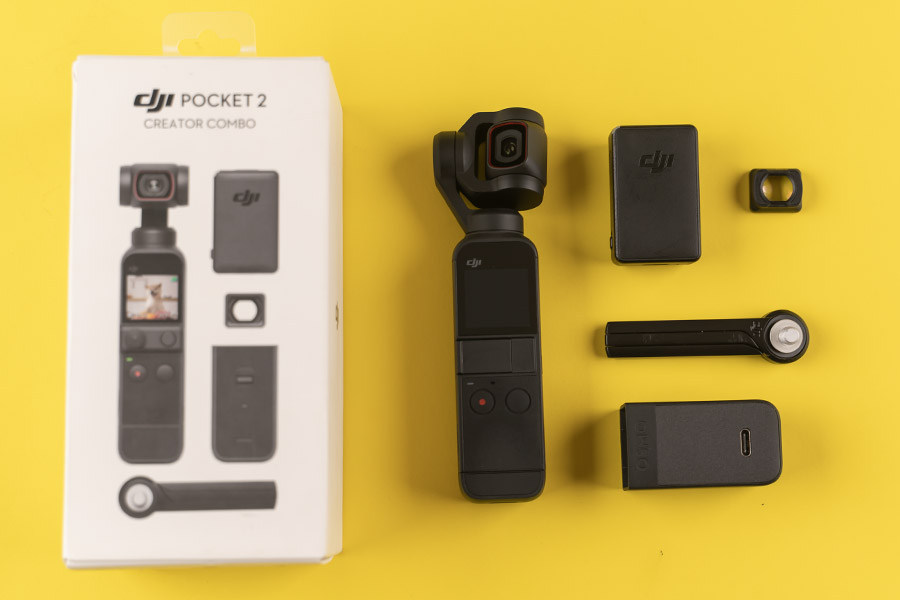
DJI recently unveiled the second iteration of its Pocket series miniature cameras—the DJI Pocket 2. As the name suggests, it fits right in your pocket. But do not underestimate its size because you can shoot some really amazing videos with this one. Let’s find out more in this review of the DJI Pocket 2.
DJI Pocket 2 Specifications:
Body: 12.4 x 38.1 x 30mm, 117 grams
Stabilization: Yes, 3-axis
Controllable Range:
— Pan: -230° to +70°
— Tilt: -100° to +50°
— Roll: ±45°
First of all, the DJI Pocket 2 comes in two variations. One is the normal pack, where you get the camera itself and some other basic things while there’s also the Creator Combo, which is the one I have here with me. This package is specially designed for creators and comes with a bunch of additional accessories like a microphone, an additional wide-angle lens, a cute little tripod, a joystick controller, and a bunch of extenders.
If you are confused about which one you should get, well, unless you are a professional, a diehard enthusiast, or a video creator, getting the creator combo is not going to be fruitful. Then again, it’s your preference and money, so I can’t say! But regardless of which version you choose, you get a cover/protector that comes in really handy while shooting because apart from the camera itself, it can fit the wide-angle lens and a couple of other things inside which helps manage your stuff.
Design & Build
Petite form-factor, pocketable
No waterproofing of any kind
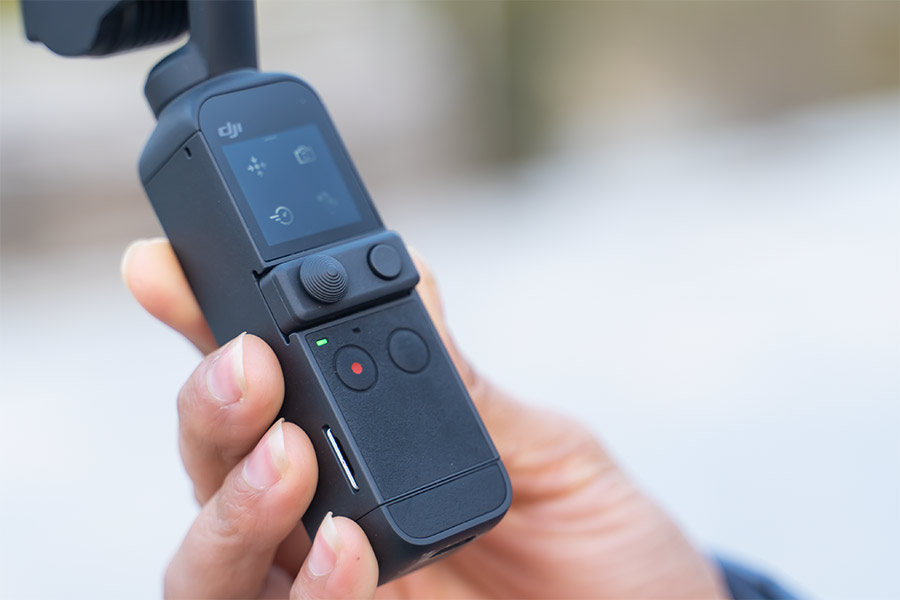
With that out of the way, let’s now kick things off starting with the design itself. This one’s probably one of the smallest cameras I have ever used. Its form factor is very similar to its previous version and it fits in your hands well easily. So even with long hours of shooting, the Pocket 2 does not get uncomfortable. It’s just that the placement of the power button sucks and even when you’re just holding the camera, you tend to accidentally press it. Having said that, you do get a longer extender, called an all-in-one handle, that helps the situation a bit.
Talking of buttons, on the front, there are two: one for recording, while the other button lets you switch between photo and video modes. As I mentioned earlier, there’s also a joystick controller that needs to be attached separately. The joystick helps control the gimbal movements and the side button is for changing gimbal settings. Talking about gimbal, the DJI Pocket 2 has a 3-axis stabilizer that lets you choose between tilt lock, Follow, or FPV modes.
1 of 3
Design
Joystick Control
USB-C
Still, a slight let down in the design front is the fact that this camera does not have waterproofing of any kind, so you will have to be extra careful with it. However, there is a separate case that can waterproof the device, but the catch is that you will have to buy it separately.
Camera
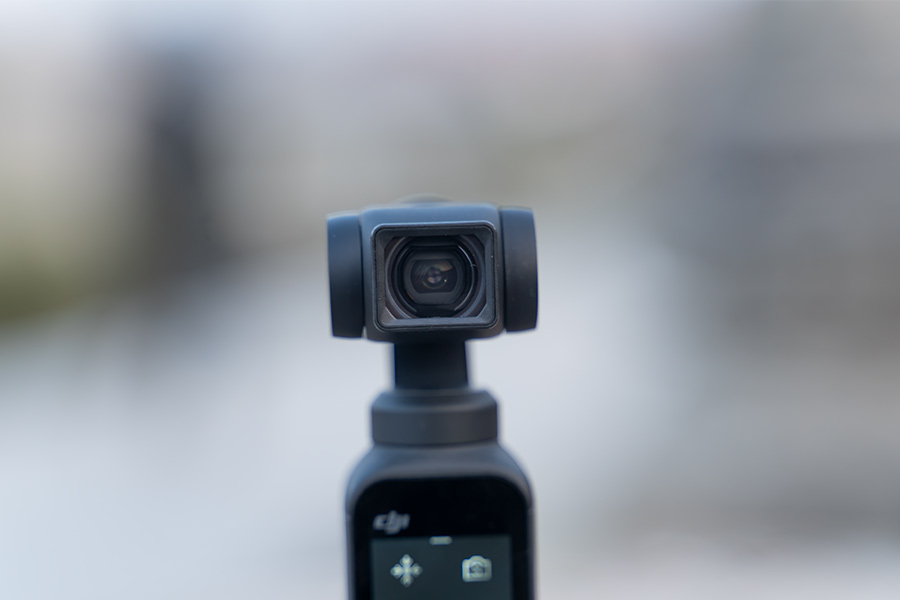
1/1.7″ CMOS sensor (64MP effective pixels)
f/1.8, FOV 93°, 20mm equivalent lens
Up to 4K UHD videos at 60fps (HDR: 2.7K@30fps)
Anyway, before getting to the core camera performance, let’s talk about what these cameras are capable of first. Using the DJI Pocket 2, you can shoot stable normal footage up to 4k 60fps, 64MP photos, panoramas, Timelapse, and slow-mo at 1080p resolution in either 120 or 240 fps.
Talking of the core camera performance, I’ve loved how the contents shot from it are sharp and portray very natural colors. I used the Insta 360 One R cameras before this one and the footage from it looked color processed straight out of the cameras. So, if you like a subtle yet natural color scheme, DJI Pocket 2 is a treat. And that’s not just in the rear footage, the camera does maintain a natural color tone in selfie videos as well. If you have watched our review of the Insta 360 One R cameras, you would know that its selfie videos don’t have very good colors. But from Pocket 2, I faced no problems regarding color reproduction or skin tone.
Note that I clicked all the videos in auto mode. But there’s also a Pro mode, which is just like manual mode in cameras that lets you play around with ISO, White Balance, shutter speed, and such.
Video stabilization
Now, back to its video capabilities, the stabilization even in the highest of resolutions is commendable. Here’s a video of me running and it’s evident from this footage that this camera can handle movements very well.
Plus, because Pocket 2 is a gimbal + camera, so you shoot in different modes and get creative shots without much hassle. As mentioned in the beginning, there’s a wide-angle lens too that attaches magnetically to the camera and lets you shoot with a wider perspective whenever you deem necessary.
ActiveTrack 3.0
Also, I love its active track feature. Basically, it actively tracks the subject’s movements and tries to keep them in the frame. This feature is really useful when you are recording by yourself as you don’t need another person to adjust the frame for you all the time. So, if you make dance covers or if you are a vlogger, I am sure you know how this feature will make your life easier.
Moving on, I also tested the camera quality during nighttime and well, it’s nothing out of the ordinary. The footage does not come out grainy even at extremely low light conditions though, such as this one where my sister is feeding some street dogs. To top things off, I can assure you that the footage from the Pocket 2 has turned out brighter than the actual ambient lighting.
What about the microphone?
Likewise, I don’t think the built-in microphone is necessarily bad in performance even when recording in a crowded place and it easily suffices for general recording purposes and vlogging. But, if you want better audio, you can opt for the extra microphone which sounds more professional and fuller. Again, let me remind you that the microphone is only available in the creator combo pack!
Moving on, the DJI Pocket 2 can also shoot photos in either 16 or 64MP resolution. They are not as sharp as you would get from your smartphone but are okay for casual photography. Additionally, it lets you shoot in RAW format so you will be able to post-process it as you like. But if you are not into that, you can simply click a JPEG picture.
Companion App
DJI Mimo app (Android/iOS)
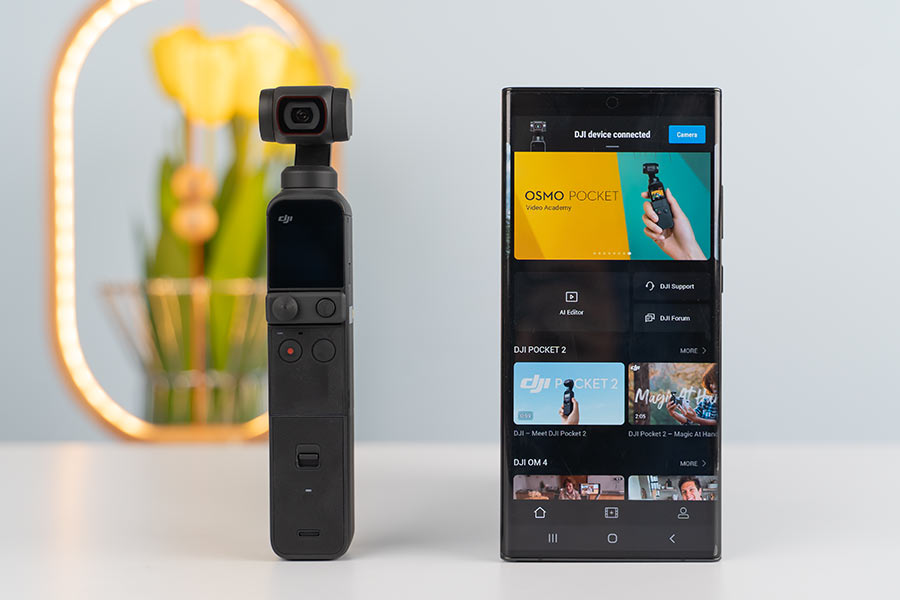
Now, let’s talk about the DJI Mimo app. You might have noticed that the content display screen here is rather small which is to be expected from a pocket camera. This makes it difficult to view or record videos. As a counter-measure, DJI lets you connect your smartphone with the Pocket 2. All you have to do is, attach the USB-C connector to the camera and then connect your smartphone.
Now, you can view the camera’s content directly on the phone in real-time. And because you have to take off the gimbal controller to attach the said USB-C connector, the app facilitates by providing all the camera and gimbal functions on the app itself. By the way, the company provides a separate lightning connector too for iPhone users.
Here, the app is very simple and easy to get along with. I like the fact that DJI gives all the info on how to get started and operate the camera through the app itself. You just need to click the button on the top right and there is everything you would want to know about the Pocket 2, its app, etc.
Video templates
There is something called an AI editor that helps you effortlessly generate attractive videos. There are several templates with different themes that you can apply to your content and make them interesting and fun. All you have to do is choose a bunch of relevant footage and select the theme you prefer and that’s it, you have your video right there.
But I do have to tell you that the Insta 360 One R cameras I reviewed before had a more extensive selection of such templates in its app which was a lot more fun than what DJI offers in its companion app. As mentioned earlier, the DJI Mimo basically gives a lot of information to its users regarding how to go about things but has very less practical usage in terms of actual video creation.
How does it compare against a flagship phone?
Okay, besides all this, I think it’s valid for one to think that the DJI Pocket 2’s capabilities are more or less similar to that of a high-end smartphone. And that is exactly what I had in mind too. The fact that modern smartphones like Samsung’s Galaxy Note 20 Ultra or the iPhone 12 Pro Max boast video shooting capabilities that go up to 4k 60fps with OIS sounds very similar to what you get with the DJI Pocket 2.
As a result, for this review, I compared DJI Pocket 2 with the iPhone 12 Pro Max. First off, I found a difference in color processing where the DJI Pocket 2 had very natural colors out of the camera. I noticed the dynamic range to be pretty similar while the 12 Pro Max had a slightly sharper output. The main point of difference however lied in the stabilization front between the two devices. While you walk at a steady pace, both of them give out a similar output. But when you run or have abrupt movements, the DJI Pocket 2 outshines the 12 Pro Max by a huge margin; all thanks to its 3-axis gimbal stabilization.
So yeah, the DJI Pocket 2 adamantly goes beyond the capabilities of a flagship smartphone. It is a capable action camera with a gimbal that even professionals can get behind.
Conclusion
To conclude, I think the DJI Pocket 2 is a great miniature camera. Its main selling point is most definitely the fact that it is an incredibly portable 2-in-1 camera plus gimbal that can shoot amazingly stable footage. As a result, it’s a great option for beginner videographers or vloggers. Also, using the Pocket 2 is not a hassle like with other action cameras I’ve tested recently, where one has to carry a lot of separate accessories like a selfie stick, monopod, etc. In contrast, the DJI Pocket 2 is very easy to get along with.
The wearable industry is seeing rapid growths in recent years. Surprisingly, Samsung doesn’t seem to have a proper stronghold in this area while Apple’s AirPods lineup of wireless earbuds consistently ranks among the most selling of its kind—one generation after the other. Well, Samsung just launched its best TWS earbuds yet. The Galaxy Buds Pro goes head to head against Apple’s AirPods Pro in practically every aspect you could think of. So, we decided to test ’em out to see if there’s one that could actually stand out. Here’s what we found.
Galaxy Buds Pro vs AirPods Pro Specs:
Samsung Galaxy Buds Pro
Apple AirPods Pro
Body (Earbud)
20.8H x 19.5W x 20.5Dmm,
6.3 grams each
30.9H x 21.8W x 24.0Dmm, 5.4 grams each
Body (Charging case)
50.2H x 50.0W x 27.8Dmm, 44.9 grams
45.2H x 60.6W x 21.7Dmm, 45.6 grams
Color options
Phantom: Violet, Black, Silver
Glossy White
Speaker
2-way speaker system
11mm woofer, 6.5mm tweeter
Custom high-excursion Apple driver, Custom high dynamic range amplifier
Motion/speech-detecting accelerometer, Dual optical, Force
Audio
360 Audio
Spatial Audio, Adaptive EQ
Active Noise Cancellation (ANC)
Yes, Ambient Mode, Voice Detect
Yes, Transparency Mode
Battery size
61mAh (earbud)
472mAh (case)
Unspecified
Battery life
Up to 5/8 hours (ANC on/off)
Up to 4.5/5 hours (ANC on/off)
Price in Nepal
Rs. 25,300
Rs. 39,500
Galaxy Buds Pro vs AirPods Pro:
Design & Comfort
Minimalistic vs Stemmy design
Lightweight, sweat/water resistant
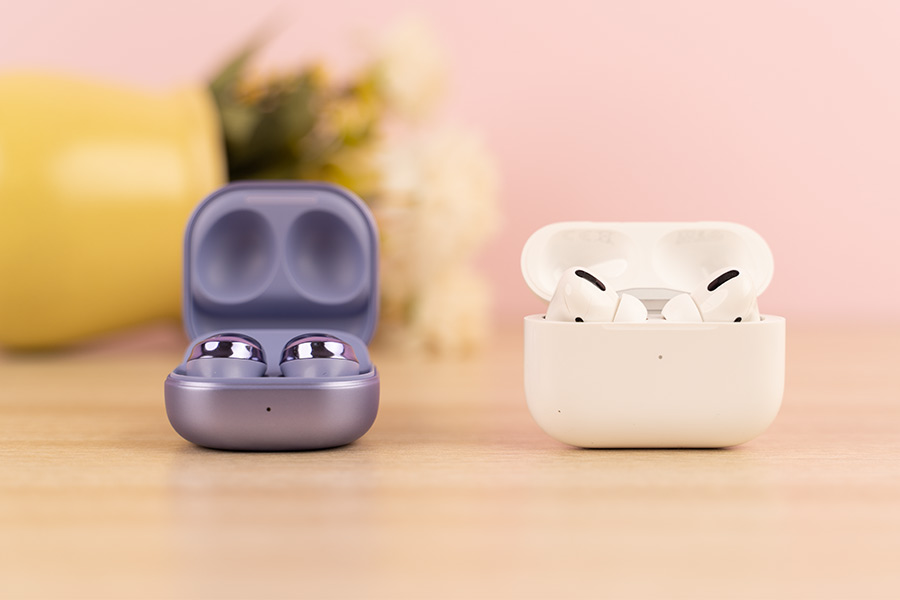
Starting with the design, as you can see, these two earbuds have different visual aesthetics. Buds Pro follows Samsung’s heritage of minimalistic canal-type design while the AirPods Pro refines the stemmy half in-ear build of its predecessors to a shorter stem and an in-ear design. It’s a matter of personal preference but I prefer the Buds Pro in this regard because of how they seamlessly blend with your ear while also looking aesthetically pleasing.
Looks aside, I find AirPods Pro to be more comfortable. Its in-ear form-factor coupled with soft silicone eartips and a lightweight build fits incredibly nice in my ears. On the other hand, the Buds Pro is approximately 20% heavier and I couldn’t get an ideal fit even when shuffling through the ear tips that come inside the box. Ultimately, I settled with the large ear tips as these don’t probe as deep into my ear canals as the rest.
Water resistance
However, it does bring a superior level of water resistance. Apple’s AirPods Pro is IPX4 rated—meaning that these can withstand water splashes or drizzles. But the Buds Pro’s IPX7 certification allows them to be fully submerged in water… if you feel like it.
Seeing how petite these are, you might be worried about losing them. But Samsung has integrated the “Find My Earbuds” feature on the Galaxy Buds Pro where if you misplace them nearby, you can ring either earbud via the Galaxy Wearable app. Apple lets you do the same for its earbuds via the Find My app as well.
Charging Case
Both AirPods Pro and Galaxy Buds Pro are packaged inside a minimalistic travel case and therefore are incredibly pocketable. Still, AirPods Pro’s case feels easier to access single-handed while the other requires you to work a bit more. Regardless, these earbuds support Qi wireless charging although Apple has gone with a lightning connection on its earbuds while the Buds Pro features a USB-C port.
Pairing
Bluetooth v5.0 connectivity
No NFC, multi-point connection
When it comes to connectivity, Bluetooth 5.0 is all you get and neither of the two equips NFC protocol. Here, Samsung has tried its level best to lock people into its ecosystem just like Apple as the Buds Pro sacrifices app compatibility on iOS. You can criss-cross device platforms to stream music but when it comes to personalizing your playback or getting additional features via an update, Samsung and Apple want you to stick to their own devices.
In its best attempt to replicate the AirPods glory, Samsung has brought a lot of matching features on the Buds Pro. But let’s talk of the OG first. Apple introduced the “automatic switching” feature on the AirPods Pro with the iOS 14 update, allowing to route the audio on the earbuds between different devices.
For instance, say you’re watching a movie on your MacBook Pro and get a call on your iPhone. Without any hassle, this feature automatically lets you take a call on the iPhone from the earbuds and switch the connection back to the MacBook once your call ends. Samsung calls its implementation “Auto Switch” and this feature is currently available only on devices running on One UI 3.1 or later.
Controls
Touch/Press controls
With that out of the way, let’s talk about the controls. Like every other Galaxy Buds in the past, this one has a touch interface on the sides—which supports tap and long-press gestures. And yeah, these are still a tad bit more sensitive than you’d want. As a result, I would inadvertently be messing with it even when I’m just trying to adjust their fit or take one out. On the contrary, Apple’s force sensor—while definitely feeling relatively unnatural—is void of this issue.
You can control playback (including skipping back a track), switch between ANC and ambient mode, or trigger the voice assistant on these earbuds. Additionally, Buds Pro and AirPods Pro also support hands-free Bixby and Siri activation. But as expected, Siri’s speech recognition and intelligence cloud Bixby’s possibilities by a fair margin.
By sacrificing the ability to switch noise control or trigger voice command, one can also choose volume control on the Buds Pro. Yet, that’s not possible with the AirPods Pro and you’ll have to manually switch between the volume levels or ask Siri for this.
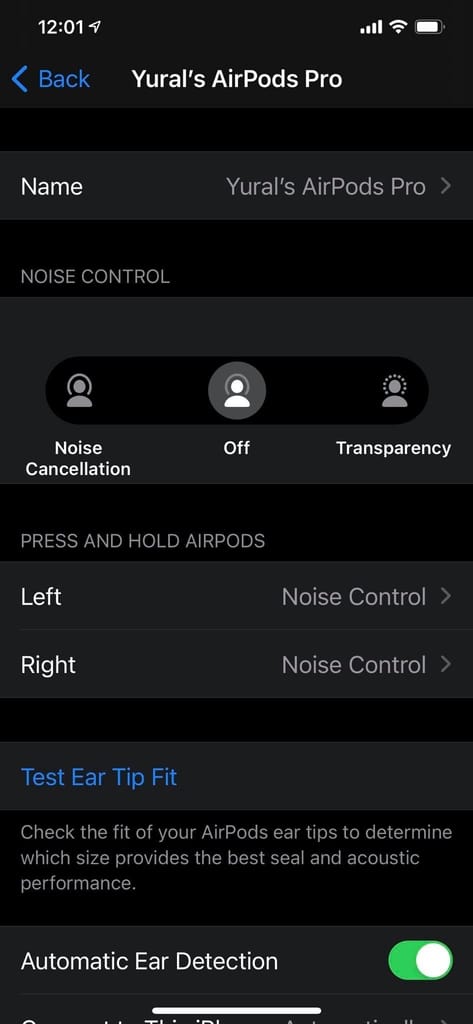
Anyway, Buds Pro seems to be missing wear detection whereas it works flawlessly on the AirPods Pro (but only on iOS devices). It feels like Samsung could easily roll out this feature seeing how its earbuds can indeed detect when you’ve taken either of them out—as it switches between the ANC and ambient sound mode in doing so.
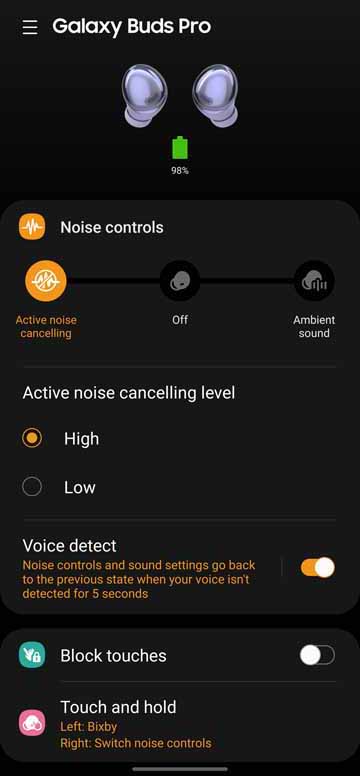
Noise Cancellation
Active Noise Cancellation enabled
Ambient Mode/Transparency Mode
Okay, so how’s the noise cancellation on the Galaxy Buds Pro? In a word, impressive—in three words, not the best. It is miles better than the ANC on the Buds Live but still falls short of the industry leaders like Apple’s AirPods Pro.
I found that the Buds Pro is mainly effective at cutting off low-frequency noises like constant hums, rumbles—while letting in mid and high-frequency sounds. For instance, the Buds Pro managed to silence the buzz of a water pump motor running in the building and the clock ticking, but would significantly let in the background TV noises. By contrast, the AirPods Pro outdoes Samsung’s Galaxy Buds Pro with noticeably quieter performance.
ANC
ANC
On outdoor scenarios too, AirPods Pro’s ANC fares better. From the passing vehicles to all the other ambient noise, this is much quieter compared to the Buds Pro. While just turning on the ANC sans some music will deliver a lackluster experience in open-air, you can vividly notice how Samsung’s earbuds let in more noise. I even tried switching to small size ear tips to see if a painfully tight seal brings any improvement but… nada.
Ambient/Transparency Mode
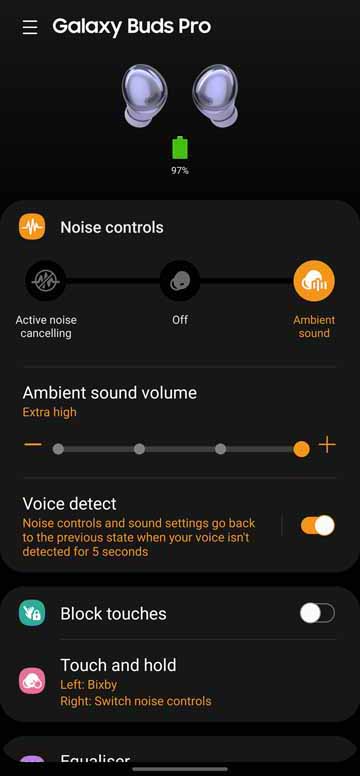
When you’d like to hear the outside world, Buds Pro also comes with an Ambient Sound mode—similar to the Transparency mode on the AirPods Pro. From a certain point, it eclipses the competition.
Not only does it let you hear the world around you, it even lets you amplify the ambient audio by up to +20 dB—divided into four levels to choose from. This could come in handy in scenarios like listening to the announcement at an airport, getting in on the conversation, etc. And if you’re coming from an older generation of Galaxy Buds, the Pro’s ambient sound mode sounds a lot more natural and less robotic.
Despite featuring a rigid transparency mode, I like AirPods Pro’s implementation better. Apple’s take on letting in outside noise remains unmatched—at least for me, while the Galaxy Buds Pro sounds just a tad bit metallic even under “low” ambient sound mode. There’s also this feature called “Voice Detect” which on the Buds Pro which automatically dials down ANC in favor of Ambient Sound mode.
Voice Detect on Buds Pro
It’s similar to the Speak-to-Chat function on Sony’s WH-1000XM4 headphone and works fine—although at times erratic. I was also weirded in multiple instances when this feature seemingly activated on its own even though I wasn’t talking—but would rather pick up on the voices of the people near me. Surreal! Having said that, it’s still a really useful feature to have—especially when you have to make small talks. You can choose to automatically switch back ANC in 5 to 15 seconds too.
Voice Detect
Ambient Sound
In terms of wireless earbuds, only the Sony WF-1000XM3 somewhat matches Buds Pro’s Voice Detect feature, while the AirPods Pro misses it out entirely. However, Sony’s “Quick Attention” requires a hands-on approach, therefore rendering Samsung’s solution all-the-more impressive.
Audio & Call Quality
Dual-speaker setup, Custom drivers
SBC, AAC, Scalable/AAC audio codec
Triple mic setup in both earbuds
Noise-canceling aside, how do these earbuds perform in terms of their audio quality? Long story short, things are pretty neck-and-neck here. Just like the Galaxy Buds+, the Buds Pro features a dual-speaker system. There’s a 6.5mm tweeter for treble and an 11mm woofer for low-frequency audio reproduction. Despite falling under the premium wireless earbuds category, it doesn’t offer high bitrate audio codecs like Sony’s LDAC or Qualcomm’s aptX HD. So, the audiophiles might have a hard time coping with Buds Pro’s SBC, AAC, and Scalable codec.
On the flip side, Apple doesn’t specify the audio driver size or the audio codec supported. But we do know that the AirPods Pro is furnished with a custom high-excursion Apple driver, high dynamic range amplifier, and adaptive EQ technology.
Any difference?
At any rate, the upgraded speaker setup on the Buds Pro definitely offers a decent bit of a thump. If that’s not enough, you can select the “Bass Boost” preset under the equalizer. Compared to the AirPods Pro, as I said earlier, the audio quality between the two wireless earbuds is almost the same. Both of them produce rumbly, punchy bass, and can get plenty loud enough as well. In Childish Gambino’s “This Is America”, the sound stage is wide enough to not overshadow the vocals.
Moving on to indie tracks like “Flapper Girl” by The Lumineers, the instrument separation is great and I could enjoy keys, guitars, perfectly. But I will say that under the “Normal” equalizer preset, the tambourine in the chorus sounds a little too sharp for my ears while it is less so on the AirPods Pro.
All in all, the Samsung Galaxy Buds Pro has an excellent sound quality—matching that of the AirPods Pro. To further round down the differences, Samsung has also introduced 360 Audio with these earbuds which is similar to Apple’s Spatial Audio.
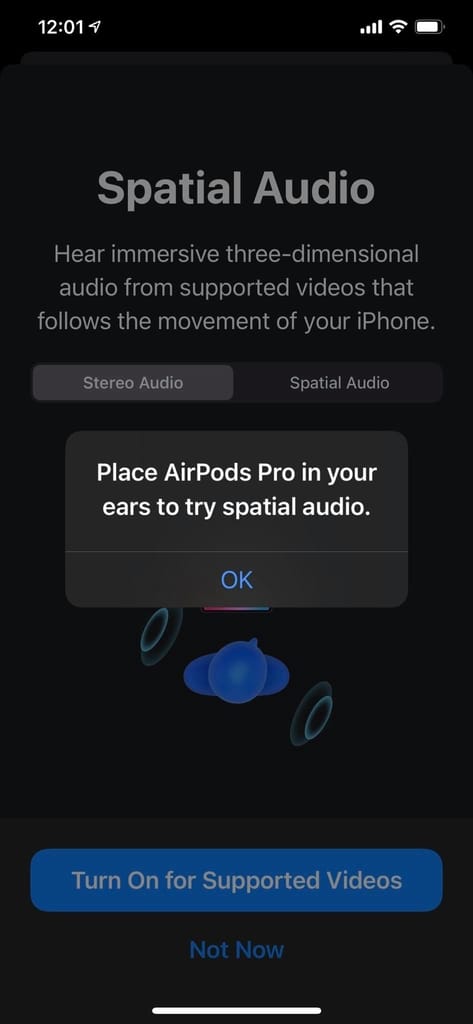
360 Audio vs Spatial Audio
Using the built-in accelerometer and the gyroscope, Dolby Head Tracking technology keeps you in the center of the action. Sadly, this feature is exclusive to Samsung phones for now. I tried it on the Galaxy S21 Ultra and maybe it was due to my noviceness to the tech, it felt rather unsettling at first. Especially when I would make a sharp movement. But after a while, I got used to it, and let me tell you—it is wild. The shift in audio’s direction is almost instantaneous and the level of immersiveness it introduces is breathtaking.
AirPods Pro’s spatial audio is equally impressive. The audio follows your head movements almost perfectly and I couldn’t notice any loss in sound quality either—all the while the phone/tablet or any other device you’re connected to stays at the center of the surround sound experience.
Spatial Audio
360 Audio
The actual audio maneuver is smooth and I’m gonna tie-in Apple TV+ here. It’s the company’s own streaming service with plenty of spatial audio-enabled content. See this ingenious cohesion throughout Apple’s product lineup—yeah, it’s these little things that has made the company so successful.
Reduced latency in Game Mode
Anyway, if you’re a gaming enthusiast, Buds Pro also has a dedicated “Game Mode” for reduced latency—that too restricted to the company’s ecosystem of products. The AirPods Pro doesn’t have a specific setting for low-latency gaming but during my test, I found that it is equally effective for gaming as well. On the whole, both these wireless earbuds are competent enough for gaming—provided that you’re on an iPhone or a Samsung smartphone.
While I was working on this review, I also received a software update that introduced hearing enhancement which is really helpful for those with partial hearing loss in either ear. Apple did something similar with the iOS 14 update called “Headphone Accommodations”. Well, it is geared towards hearing enhancement but not the way Samsung does it. Instead, this accessibility feature amplifies certain frequencies of sound to customize one’s hearing preferences.
Call Quality
Let’s now get into the call quality of the Galaxy Buds Pro. It has a 3 microphone in total and a dedicated voice pickup unit for clear calls. Out of the two mics on the outside, one of them is configured with a high Signal-to-Noise Ratio (SNR) to drown out the background noises. And yeah, they do the job perfectly. I didn’t receive any complaint on my phone calls—even when I was talking with my mask-on outdoors. Apple does calls exceptionally well too and I have no criticism on that matter.
Interestingly, the Buds Pro also boasts Wind Shield technology which is supposed to block wind interference for clear calls—while Apple claims effective calls in windy situations with the mic design on the AirPods Pro. I tried simulating a windy environment by recording audio directly facing a fan. Compared to the AirPods Pro, there is a diminutive yet perceptible level of precedence in call quality and I’m quite impressed with this feature. Yet, don’t expect much from a highly windy environment.
Battery Life
Up to 5/4.5 hours of playback (with ANC)
USB Type-C/Lightning port, Qi wireless charging
Finally, it’s time to talk about battery life. I’ll just say this, coming from the Galaxy Buds+, Samsung has effectively written off its legacy in terms of playback time on the Buds Pro. Equipped with a smaller 61mAh cell in each earbud, the company promises up to 5 hours of continuous playback with ANC on, and an additional 3 hours with ANC off.
Just 5 hours of rated battery endurance on the Buds Pro is a major let-down. Two hours in with ANC turned on all the while I’m shuffling through tunes at 70-90% volume, I’m already looking at just 52% charge left. And the Buds Pro would usually give up on me after approximately 4 hours and 15 minutes. With ANC turned off, you can add up to 3 hours more of playback. Thankfully, it also supports quick charging that supplies an hour of juice after just 5 minutes of plugging it in.
On the other hand, the AirPods Pro doesn’t do much when it comes to battery endurance either. Still, I was able to get 4.5 hours of playback time on average—with a similar listening setting as the Buds Pro.
Galaxy Buds Pro vs AirPods Pro: Conclusion
Bringing this comparison to a conclusion, as you could tell, these two earbuds are extremely similar to each other. Samsung has brought its A-game to rival Apple’s AirPods Pro and so far—it’s a job well done. From their audio quality, ANC, to other assorted features, the Buds Pro matches the AirPods Pro exceptionally well. Samsung’s further inspiration from its rival comes from the fact that it has chosen to restrict a couple of features into its ecosystem.
Because of this, I feel like the Buds Pro and AirPods Pro are worth it—but only to those in the respective ecosystem. But if you use phones from other brands, the price-tag and the imposed feature restrictions of either earbud don’t make much sense and you’re better off looking at the alternatives from its competitors like Bose, Jabra, Sennheiser, etc.
Songs referenced in the Galaxy Buds Pro vs AirPods Pro comparison:
In the past 24 hours, Fujifilm has announced multiple new products including cameras and lens. It even confirmed future firmware updated for some of the existing cameras. Among the recently launched product is the new Fujifilm GFX100S – the company’s latest medium format camera. In this post, we will take a look at the specs, features, expected price, and availability of Fujifilm GFX100S in Nepal.
Fujifilm GFX100S Overview:
The GFX lineup of medium format cameras was launched back in 2017. Two years after the initial launch, the company announced the GFX100 in 2019. Now, the company has announced the GFX100S to give continuity to an already popular lineup.
Design and Body
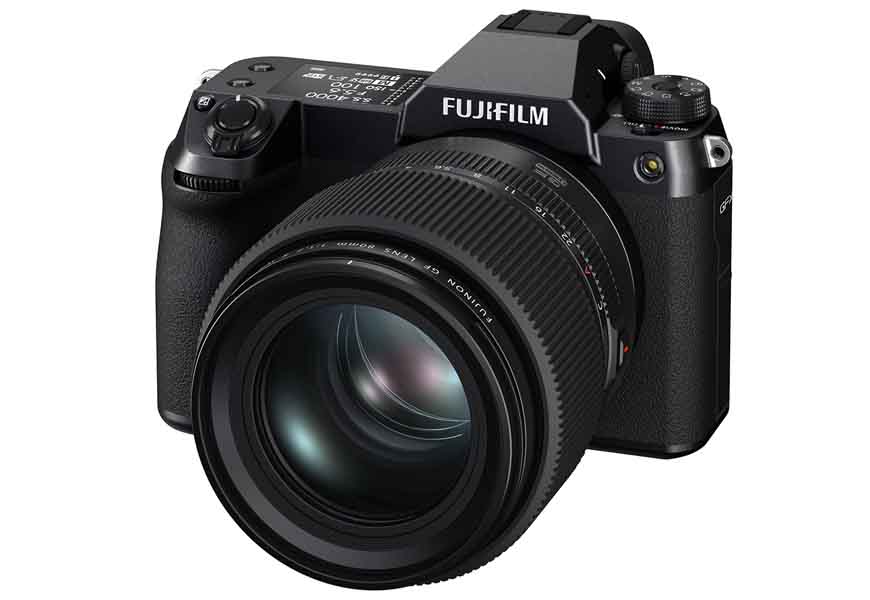
Fujifilm GFX100S is a mirrorless digital camera that sports a 102MP back-illuminated CMOS image sensor. The sensor is paired with a quad-core X-Processor 4. The camera makes use of the FUJINON GF lens. The camera has a magnesium alloy case and can operate at temperatures as low as -10-degree Celsius. Fujifilm has even managed to make the camera 500g lighter than the GFX100. The reduction in the size is because of the new shutter unit and IBIS mechanism.
Shooting Capabilities
The camera is capable of recording 4K 4:2:0 10-bit video at 30fps directly onto the SD card. Similarly, it can output 4K 30fps 4:2:2 10-bit video via the HDMI port. The 49.5mm diagonal sensor area promises better ISO, shallow depth-of-field, and wider tonal reproducibility. The camera supports H.264 and H.265/HEVC compression codes. It also supports “F-Log” and “Hybrid Log Gamma (HLG)” for HDR recording.
The new IBIS mechanism is nearly 20% smaller and 10% lighter compared to that on the GFX100. It comes with 6.0 stops of 5-axis in-body stabilization. In addition to the gyro and acceleration sensor, it also makes use of the new vibration-reducing stabilization of better stabilization.
Improved AutoFocus
GFX100S has 3.76 million phase-detection points that nearly cover 100% of the surface. Fujifilm has also updated the movement prediction algorithm and face/eye detection. As a result, the new camera can track moving objects and people more accurately. The company even claims that when used with appropriate lenses, the camera achieves a smooth focus of -5.5EV even in dark conditions.
User Convenience
The top mode dial has size positions that users can customize for different functions as per their convenience. Fujifilm has also made the Focus Lever flat and claims that it will help reduce physical discomforts. It has a 3.2-inch LCD monitor that can tilt in three different directions. In addition, there is a 1.8-inch sub LCD monitor on the top that displays key EXIF settings.
Fujifilm GFX100S Price in Nepal and Availability
Fujifilm GFX1000S has a price tag of $6,000 and will be available from late February. The price tag may sound a lot but in the world of medium format cameras, the Fujifilm GFX1000S is among the cheapest. Just consider this – the Fujifilm GFX100 had a $10,000 price tag.
There is no information about its availability in Nepal. But if it were to launch here, we can expect the price of the Fujifilm GFX100S in Nepal to be around NPR 800,000.
Intel is not a name that you normally link with GPUs. The company is popular for its processors. Even so, Intel has tried its hand on the GPU market a few times in the past. The company has now launched its first dedicated desktop GPU in decades. Intel Iris Xe is an entry-level discrete graphics for desktops. Let’s take a look at the specs, features, and availability of the Intel Iris Xe desktop graphics card (GPU).
Intel Iris Xe Desktop GPU Overview:
The new desktop GPU from Intel has been placed under the company’s Iris Xe-graphics lineup. Iris Xe graphics was first announced as an integrated solution of the 11th-gen Intel Tiger Lake processors. Intel then launched Iris Xe Max graphics – dedicated GPU for mobile platforms (laptops) back in October 2020. It was then that the company announced its plan to launch a dedicated graphics solution (code-named DG1) within the first quarter of 2021.
Intel has fulfilled its aforementioned promise. The new Iris Xe desktop graphics is based on the scalable Xe-LP architecture. Still, it is not a product that can compete against NVIDIA and AMD’s offering. It’s a GPU with entry-level specs. The specs are even lower than the mobile counterpart. Iris Xe desktop graphics sports 80 execution units and features up to 4GB of LPDDR4X VRAM.
The graphics can support up to three simultaneous 4K HDR displays. Additional features include AV1 decoding, Adaptive Sync, and DP4a deep-learning interference acceleration.
Features:
Support for up to three 4K UHD displays
AV1 codec for high fidelity video calling
HEVC, AVC, VP9, and SCC transcode capabilities
DP4a AI for photo editing
Intel Iris Xe Desktop Graphics Availability
Here, Intel Iris Xe desktop GPU is not available for the general public. Intel, together with its two partners including Asus, has made the graphics solution available for system integrators to include it in their pre-built system.
Back in November, Samsung unveiled the Galaxy A02s. And now, the company has announced the vanilla Galaxy A02 in Thailand. In this post, we will be taking a look at the specs, features, expected price, and availability of the Samsung Galaxy A02 in Nepal.
Samsung Galaxy A02 Overview:
Design and Display
Like the Galaxy A02s, the vanilla A02 features a 6.5-inch LCD panel. It’s an HD+ screen with a resolution of 720 x 1600 pixels. The display has an Infinity-V notch that houses the front-facing camera. Bezels around the screen are quite noticeable, especially on the bottom chin.
The panel on the back of the device is covered with strips. There is a pill-shaped camera module on the left side of the panel with an LED flash just below it. The phone is 9.1mm thick and is available in two color options – Black and Blue.
Performance and Memory
Galaxy A02 differs from the A02s as it packs a MediaTek processor. Powering the phone is a quad-core MediaTek MT6739W CPU with a clock speed of up to 1.5GHz. Graphics are handled by PowerVR Rogue GE8100 GPU. The phone comes with 3GB of RAM and 32GB of internal storage. Latter can be extended up to 1TB using an external microSD card.
The phone ships with the One UI core edition. It is a toned-down version of Samsung’s custom UI that is used on its M-series and budget devices.
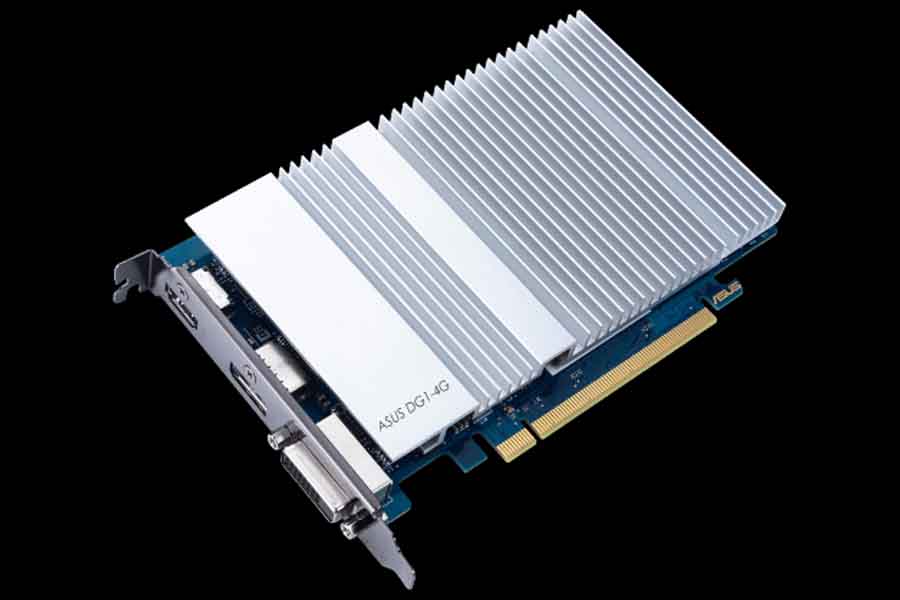
Camera
The pill-shaped camera on the back encloses two cameras. Its dual-camera setup consists of a 13MP primary lens accompanied by a 2MP macro sensor. When compared to the A02s, the A02 lacks a 2MP depth sensor. On the front, both devices feature an 8MP selfie camera.
Rest of the specs
Galaxy A02 has a 5,000mAh battery. Samsung is claiming up to 19 hours of video playback time on a full charge. The phone features a micro USB port (USB 2.0) for charging. It doesn’t support any fast charging technology. In terms of connectivity, the phone supports 4G LTE, Wi-Fi b/g/n, and Bluetooth 5.1.
Connectivity: 4G LTE, Wi-Fi b/g/n (2.4GHz), Bluetooth 5.1, micro USB (USB 2.0)
Battery: 5000mAh
Samsung Galaxy A02 Price in Nepal and Availability
Samsung Galaxy A02 is available in Thailand with a price tag of 2,999 Thai Baht for the 3/32GB variant. We can expect the price of the Samsung Galaxy A02 in Nepal to be around NPR 12,000.
Samsung Galaxy A02
Price in Thailand
Price in Nepal (Expected)
3/32GB
THB 2,999
NPR 12,000
As you can see, the A02 is a lot similar to the recently launched M02s. To keep the prices down, Samsung has dropped the depth sensor and fast charging technology. As such, would you like to see it launch here? Let us know in the comments section.
Also, check out our review of the Samsung Galaxy M02s.
Sony has finally made the Xperia Pro available for purchase for the general public. For those unaware, Sony first announced the device alongside the Xperia 1 II almost a year ago. Xperia Pro is based on the Xperia 1 II but has added features that the phone is targeting professional photographers and videographers. Let’s take a look at the features, expected price, and availability of the Sony Xperia Pro in Nepal.
Sony Xperia Pro Overview:
Since the Sony Xperia Pro is based on and shares most of the specs with the Xperia 1 II we are not going to discuss it in this post. This post will rather focus on how it differs from the Xperia 1 II, the company’s motive behind the phone, and what it offers to professional photographers. But before we begin, here is a quick recap of the specs that the Xperia Pro packs.
Sony Xperia Pro Specifications
Body: Corning Gorilla Glass 6 front; IP65/68 Water Resistance
Connectivity: Dual-SIM (Nano), WiFi 802.11 a/b/g/n/ac/ax, Bluetooth 5.1, GPS/A-GNSS(GPS+GLONASS), USB Type-C (3.1 Gen 2), HDMI micro connector, NFC, PS4 Remote Play
Battery: 4000mAh with USB-PD fast charging
Camera-like Build
The first difference between the two phones can be found in the material of the phones. While the Xperia 1 II sports a glossy glass design on the back, it has been ditched for a polycarbonate back on the Pro. In a smartphone world, plastic is considered cheap however a robust plastic frame is what cameras and accessories need for durability. The plastic case of the Xperia 1 II makes it look and feel like the camera equipment that it is.
mmWave 5G Network
Another selling point of the phone is its support for the mmWave 5G network. Though mmWave is faster than sub-6GHz, the latter is more stable and offers wider coverage. The 360-degree antenna system on the Xperia Pro has antennas at four sides of the technique. The antennas are based on beamforming technology. Also, the material used on the case of the phone has a low dielectric constant and thus offers less resistance to the 5G waves. To cope with the issues of variations on reception and speed of mmWave, the device has a network visualizer app preinstalled.
Dedicated Micro-HDMI Port
The next highlight of this device is that it has a dedicated Micro-HDMI port. Sony claims that the Xperia Pro is the world’s first device to have this feature. The port is placed right next to the USB Type-C. With this, you can now connect your Xperia Pro to your camera and use it as a viewfinder or an external monitor. You can then play with limited camera settings like brightness, grid lines, and zoom straight from the phone itself. And the presence of the Micro-HDMI port means that the Type-C port will always be vacant which can be used to supply juice to it – something you cannot do with traditional external monitors.
Can it replace external monitors?
Sony wants you to think that Xperia Pro with its 4K HDR OLED panel and BT.2020 color gamut (though it doesn’t cover all of it) is a good replacement for the heavy and power-hungry external monitors but it also has its downsides. For instance, you cannot record footage separately from the camera. Also features like waveforms and focus peeking are not supported by the Xperia Pro, and these are some essential features for videographers.
Livestreaming Equipment
You may also argue that smartphones prior to the Xperia Pro could also be used as an external monitor for cameras. There are apps that allow you to do so over Wi-Fi and Bluetooth connectivity. However, having a dedicated Micro-HDMI connector means you can now shoot videos from your camera and livestream them via third party applications over a mobile 5G connection. This is something that other normal phones are incapable of.
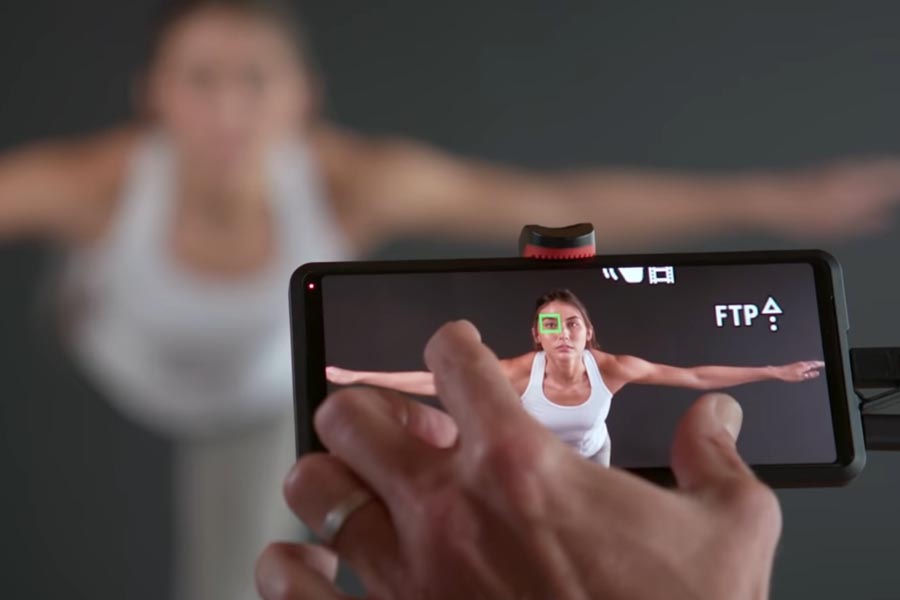
High-Speed FTP Transfer
You can connect the phone to compatible Alpha cameras like the newly announced Alpha 1 and use the device’s 5G mmWave connection for high-speed PC Remote data transfer. This will allow users to handle the transfer of high-quality images in an efficient manner using an FTP server.
Sony Xperia Pro Price in Nepal, Availability, Target Audience
So who is the Sony Xperia Pro for? Well, Sony Xperia Pro is a niche product tailored towards a very specific group. The regular Xperia 1 II will do just fine to most of the users but the added features of the Xperia Pro appeal to professional photographers and videographers that are into Sony cameras.
The phone does not come cheap. Even with the spike in flagship devices that we witnessed in the smartphone market last year, I think the $2,499 price tag stretches it too far. Even for the price, you are not getting the latest hardware. The phone was announced last year and packs in last year’s Snapdragon 865. The phone heavily relies on the mmWave 5G connectivity which is still not accessible.
If it’s ever launched here in Nepal, we can expect the price of the Sony Xperia Pro to be around NPR 4,05,000.
Smartphone
Price in the US
Price in Nepal (Expected)
Sony Xperia Pro
$2,499
NPR 4,05,000
Check out our review of the Samsung Galaxy S21 Ultra.


![Pocket 2 - Design [1]](https://cdn.gadgetbytenepal.com/wp-content/uploads/2021/01/Pocket-2-Design-1.jpg)

![Pocket 2 - Design [2]](https://cdn.gadgetbytenepal.com/wp-content/uploads/2021/01/Pocket-2-Design-2.jpg)

![Buds Pro - AirPods Pro - Design [2]](https://cdn.gadgetbytenepal.com/wp-content/uploads/2021/01/Buds-Pro-AirPods-Pro-Design-2.jpg)


![Buds Pro - AirPods Pro - Design [3]](https://cdn.gadgetbytenepal.com/wp-content/uploads/2021/01/Buds-Pro-AirPods-Pro-Design-3.jpg)

![Buds Pro - AirPods Pro - Design [1]](https://cdn.gadgetbytenepal.com/wp-content/uploads/2021/01/Buds-Pro-AirPods-Pro-Design-1.jpg)
![Buds Pro - AirPods Pro - Design [4]](https://cdn.gadgetbytenepal.com/wp-content/uploads/2021/01/Buds-Pro-AirPods-Pro-Design-4.jpg)